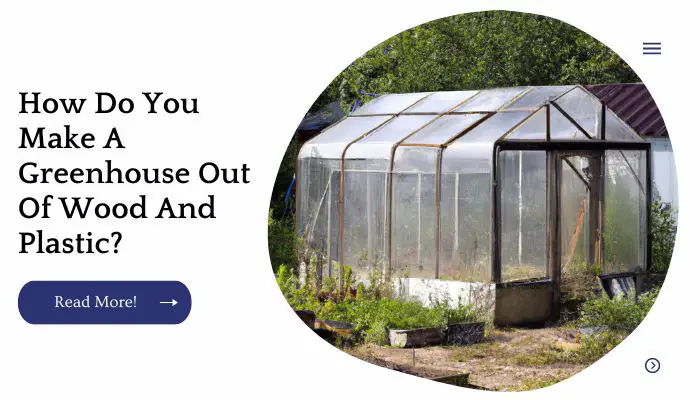
A greenhouse is one of the best ways to start a garden this time of year. The winter season can be tough on plants, and they need the extra warmth and protection offered by a greenhouse.
But what if you don’t have any extra money to spend on building materials? You can still create an awesome greenhouse with some simple supplies from your local hardware store and some elbow grease!
| Takeaways |
|---|
| – Building a greenhouse using wood and plastic materials offers a cost-effective and versatile option. |
| – Wood provides a sturdy and reliable frame for the greenhouse structure. |
| – Plastic materials such as polycarbonate panels or polyethylene film are commonly used for the greenhouse covering. |
| – Proper insulation and sealing are crucial for maintaining the desired temperature and humidity levels inside the greenhouse. |
| – Ventilation systems play a vital role in regulating airflow and preventing heat buildup. |
| – Careful planning and design considerations, such as the orientation and placement of the greenhouse, can optimize sunlight exposure for plant growth. |
| – Greenhouses offer a controlled environment for growing plants and extending the growing season. |
| – Regular maintenance and monitoring are necessary to ensure the longevity and functionality of the greenhouse. |
| – Building a greenhouse requires attention to structural integrity, weather resistance, and proper drainage. |
| – Incorporating additional features like shelving, benches, and irrigation systems can enhance the functionality and productivity of the greenhouse. |
Step 1: Find A Good Location
Find a good location for your greenhouse. A greenhouse should be level, and have good drainage, protection from wind and rain, protection from animals and people, and stay out of the sun.
Mark out where you want to put your greenhouse on the ground with stakes or other markers so you can see what it will look like when it is built.
Make sure that any area that gets direct sunlight is covered in shade cloth or tarpaulin if possible to keep the plants inside cooler during hot weather
If you’re interested in constructing a greenhouse out of plastic, our comprehensive guide on how to build a greenhouse out of plastic provides step-by-step instructions and valuable insights to help you get started on your project.
Step 2: Clear The Site
When you’re clearing the site, remove any debris or trash. Also, remove any weeds and rocks, bricks or concrete blocks that need to be removed.
You will want to clear all of the gravel, sand and dirt from the area as well. Remember that grass grows back quickly so don’t leave it on your site after construction is complete because it will grow right over your greenhouse!
Step 3: Make A Plan For Your Greenhouse
Before you begin to build, it’s important to know what you want your greenhouse for. Will it be a place where you can grow plants or store tools? Do you need space for a workbench or other items? This will help determine the size and type of structure that would be best for your needs.
Consider what materials are available in your area before choosing which type of building will work best for your situation.
For example, if there is an abundance of wood but no plastic nearby, then perhaps building a wooden greenhouse would be better than one made from plastic sheets.
Make sure that you have enough money available to purchase all necessary supplies and materials in order to complete your project quickly and efficiently without having many interruptions along the way due to lack of funds or resources (e.g., labor).
To maintain the longevity and beauty of your gazebo canopy, it’s essential to follow effective treatment methods. Explore our expert tips on treating a gazebo canopy to learn about the best practices for preserving and protecting your outdoor structure.
Step 4: Build A Foundation
Now that you’ve built the frame, it’s time to start building your foundation. A good foundation should be at least 6 inches deep and wide enough to support the weight of your greenhouse. Make sure this area is level as well!
You can use concrete or stone if you have them on hand, but if not, there are other options available.
For example: wood beams with a large base made out of lumber will help keep your structure stable; steel beams are another option for strength; bricks make for a sturdy foundation as well (though they may require extra maintenance).
Step 5: Lay Down The Floor Base Boards
Once you have your floor boards in place, you can start to lay down your greenhouse baseboards.
The baseboards are the foundation of your greenhouse and without them there would be nothing for the walls to rest on.
It’s essential that these are at least 1 inch thick and made from a sturdy material such as wood or plastic so they don’t bend when weight is put on them.
It’s also important that they are at least 12 inches wide and 12 inches long so that the entire surface of each piece can touch the ground when laid flat against it.
| Step | Description |
|---|---|
| 1 | Measure and cut the floor base boards to fit the dimensions of your greenhouse. |
| 2 | Lay the base boards on the prepared foundation, aligning them along the perimeter. |
| 3 | Secure the base boards to the foundation using appropriate fasteners or adhesive. |
| 4 | Ensure that the base boards are level and properly aligned with each other. |
| 5 | Inspect and adjust the base boards as needed to ensure a secure and even flooring surface. |
Step 6: Mark The Floor Joists And Place Them
Using a chalk line, mark the position of each joist. You may need to use a tape measure and pencil to mark the positions of all four sides of each piece of wood.
Place them onto your greenhouse base in their marked positions and check that they are level and square with each other.
The floor joists should be placed perpendicular to the walls and parallel with one another, so it’s important that you get these measurements right before fixing them into place.
Don’t let water leakage ruin your camping experience! Our easy-to-follow guide on sealing a water tent provides step-by-step instructions and effective solutions to keep your tent dry and comfortable, even during rainy adventures.
Step 7: Install The Floor Sheeting
The flooring is the next step. The best type of material to use is a mat made from recycled plastic bottles, but if you don’t have access to that then a standard sheet of plywood or OSB (oriented strand board) will work just fine.
You’ll want to cut out holes for your poles before you attach them on top of the cross beams. You can make these holes with a circular saw or even just an old school jigsaw if you don’t have access to power tools.
Once your flooring is installed and level, it’s time for some finishing touches!
Step 8: Determine Where To Place Your Doorway And Windows
You’re almost done! The next step is to determine where you want your doorways and windows to be. You can make these as large or small as your greenhouse requires.
First, consider the size of your greenhouse. As a general rule, it should be at least twice as long as it is wide – otherwise wind will blow through the structure and cause problems for you later on down the line.
Next, look at where the sun shines during different parts of the day (this will change depending on where in the world you live).
If possible, place windows so that they face southward towards this direction most of time; this will maximize natural light exposure for plants inside their native environment outdoors but still give them protection from harsh winds or cold temperatures outdoors too (because glass retains heat).
If possible also consider placing doors opposite each other so that air circulates freely without having trouble getting out when necessary (such as during hot summer days);
Note however that ventilation holes must still remain open so that moisture doesn’t build up inside which could cause mold growth later on down road – just don’t go overboard here either because then again if there’s no way out then neither will air flow properly either…
| Aspect | Considerations |
|---|---|
| Doorway | |
| 1 | Position the doorway for convenient access and ease of entry into the greenhouse. |
| 2 | Consider the prevailing wind direction to minimize drafts when selecting the doorway location. |
| 3 | Take into account the path of sunlight to ensure optimal natural lighting and temperature distribution. |
| Windows | |
| 1 | Strategically place windows to allow for proper ventilation and airflow within the greenhouse. |
| 2 | Consider the orientation of the greenhouse to maximize exposure to sunlight through the windows. |
| 3 | Determine the desired size and number of windows based on the greenhouse’s size and specific needs. |
Step 9: Cut Out Doorway And Windows From The Plastic Sheeting
The greenhouse that we are building is going to be heated by the sun, so there will not be a need for a door in the winter.
However, it is important that you cut out a doorway for your greenhouse so that you can get in and out in the summertime.
To make this happen, you need to measure from one of the corners of your greenhouse (you can use any corner) and draw a line across three sides of the greenhouse.
You should then cut along those lines with an electric saw or jigsaw. If you have access to these power tools, they’re probably going to come in handy when building anything like this!
If you don’t have access to power tools or don’t want them near small children or pets who might get hurt by them (or simply aren’t comfortable using such dangerous equipment), then continue reading below instead
Proper waterproofing is essential for maintaining a functional and protected greenhouse. Discover the easy and efficient methods outlined in our guide on waterproofing a greenhouse to ensure optimal conditions for your plants and create a sustainable growing environment.
Step 10 Install Plastic Sheeting Onto Walls And Roof
Attach plastic sheeting to the walls and roof. Start by positioning the plastic sheeting over one of the walls. Make sure it is tight, and then use a staple gun to secure it in place.
Repeat this process with all four sides of your greenhouse, attaching one piece of plastic at a time.
Attach plastic sheeting to poles: Use zip ties to attach each side of your greenhouse to a metal pole; make sure they are tight so that wind won’t blow them away!
Step 11 Insert The Poles Into The Base Of Your Greenhouse.
Now that you’ve installed the base, it’s time to insert the poles into their place. The poles should be placed in a way that creates a stable structure and prevents them from falling over too easily.
To do this, you’ll want to place them at an angle (preferably 45 degrees) so they don’t fall over when they’re used as supports for your greenhouse.
It’s important that these are placed far enough away from each other so that there is no risk of them touching one another; if they do touch, this could cause them to snap off entirely or become unstable in their placement.
| Step | Description |
|---|---|
| 1 | Position the base of your greenhouse in the desired location. |
| 2 | Align the poles with the corresponding holes or slots on the base. |
| 3 | Insert the poles firmly into the base, ensuring a secure fit. |
| 4 | Check that the poles are straight and evenly inserted. |
| 5 | Double-check the stability of the poles in the base to ensure proper support for the greenhouse structure. |
Finally, Attach Plastic Sheeting To Poles
To attach the plastic sheeting to the poles, use a staple gun. Make sure that all of your pieces are stuck together, and then tie them in place with a rope or twine.
Finally, staple each side of your greenhouse to the posts for extra strength
Protecting your greenhouse from the damaging effects of strong winds is vital for its structural integrity. Learn effective techniques for securing a greenhouse from the wind in our comprehensive guide, ensuring a safe and stable environment for your plants to thrive.
Conclusion
My advice is to make sure you have a solid plan before starting your greenhouse. You can use the information provided here in this article as a guide, but it’s recommended that you do some research on other sites as well.
There are many resources available online that will help with planning your project and building it correctly (such as ours!).
Keep in mind what type of budget you have set aside for this project as well; we hope this article has given some insight into how much money goes into creating something like this!
Further Reading
Here are some additional resources that provide further insights and information on building greenhouses:
How to Build a Greenhouse Made From Plastic Bottles: Discover an innovative approach to building a greenhouse using recycled plastic bottles. This detailed guide offers step-by-step instructions and creative ideas for constructing an eco-friendly greenhouse.
How to Build a Greenhouse: Learn the essential steps and techniques involved in building a greenhouse. This comprehensive resource covers everything from selecting materials to setting up the structure, providing valuable insights for both beginners and experienced builders.
Free Greenhouse Plans: Explore a collection of free greenhouse plans that cater to various sizes, styles, and budgets. Whether you’re interested in a small backyard greenhouse or a larger structure, this resource offers a wide range of plans to inspire and guide your greenhouse project.
FAQs
How long does it take to build a greenhouse?
Building a greenhouse can vary in time depending on factors such as size, complexity, and the availability of materials and assistance. Generally, it can take anywhere from a few days to several weeks to complete a greenhouse construction project.
What materials are commonly used to build a greenhouse?
Commonly used materials for greenhouse construction include glass, polycarbonate panels, plastic film, and wood or metal frames. The choice of materials depends on factors such as budget, climate conditions, and personal preferences.
How much does it cost to build a greenhouse?
The cost of building a greenhouse can vary significantly depending on factors such as size, materials used, and design complexity. A small, basic greenhouse can cost a few hundred dollars, while larger, more advanced structures can range into the thousands or even tens of thousands of dollars.
Do I need a building permit to construct a greenhouse?
The requirement for a building permit to construct a greenhouse varies depending on local regulations and the size of the structure. It is advisable to check with the local building department or authorities to determine whether a permit is necessary for your specific location.
How do I maintain the temperature inside a greenhouse?
Maintaining the temperature inside a greenhouse involves techniques such as proper ventilation, shading, insulation, and heating. By monitoring and adjusting these factors, you can create a favorable environment for your plants throughout the changing seasons.

I am Hellen James, a professional handywoman with expertise in improving home and garden spaces by using pergolas, gazebos, and tents.
