
Welcome to our comprehensive guide on how to make a sun canopy! Whether you’re looking to add shade to your backyard, create a cozy spot on your patio, or enhance your outdoor living space, a sun canopy can be a fantastic solution.
In this article, we’ll walk you through the process of making your own sun canopy, from understanding the basics to selecting materials and sewing techniques. Let’s dive in!
| Takeaway |
|---|
| Making a sun canopy can enhance your outdoor space by providing shade, UV protection, and a cozy atmosphere. |
| Choose durable, UV-resistant fabric for your canopy and follow proper maintenance practices to prolong its lifespan. |
| Accurate measurements, precise cutting, and secure attachment to support structures are essential for a successful canopy. |
| Regular cleaning and UV protection will help maintain the appearance and functionality of your sun canopy over time. |
| Consider the versatility and benefits of sun canopies when planning your outdoor living space. |
2. Understanding Sun Canopies

Before we jump into the DIY process, let’s take a moment to understand what a sun canopy is and how it can benefit you. A sun canopy is a lightweight, portable shelter typically made from fabric or other materials.
Constructing a canopy over windows enhances privacy and aesthetic appeal. Learn how to build a canopy over window using simple techniques for a charming exterior upgrade.
Its primary purpose is to provide shade and protection from the sun’s harmful UV rays. Sun canopies come in various shapes and sizes, ranging from simple triangular sails to elaborate structures with multiple panels.
Table: Different Types of Sun Canopies
| Type | Description |
|---|---|
| Triangular Sail | Simple, three-sided canopy often used for small areas like patios or poolside lounges. |
| Retractable Awning | Motorized or manual canopy that can be extended or retracted as needed. |
| Shade Sail | Large, rectangular canopy stretched between anchor points to create a shaded area. |
| Pergola Canopy | Canopy designed to cover a pergola structure, providing shade and ambiance. |
Now that we have a basic understanding of sun canopies, let’s explore the benefits they offer.
Benefits of Sun Canopies
Sun canopies offer a range of benefits beyond just providing shade. Let’s take a closer look at some of the advantages of incorporating a sun canopy into your outdoor space:
1. UV Protection
One of the most significant benefits of a sun canopy is its ability to block harmful UV rays from the sun. UV radiation can cause skin damage, premature aging, and increase the risk of skin cancer. By installing a sun canopy, you create a safe and shaded area where you can relax outdoors without worrying about sunburn or other sun-related issues.
Ensure durability and weather resistance by properly sealing your canopy. Discover effective methods on how to seal a canopy to prolong its lifespan and maintain optimal performance in various outdoor conditions.
2. Temperature Control
Sun canopies help regulate the temperature of outdoor spaces by blocking direct sunlight and reducing heat buildup. This can make your patio or deck more comfortable during hot summer months, allowing you to enjoy outdoor activities without feeling overheated.
3. Enhances Outdoor Living
Adding a sun canopy to your outdoor area can transform it into a functional and inviting space for relaxation, dining, or entertaining guests. With the right design and placement, a sun canopy can create a cozy atmosphere and define different zones within your outdoor living space.
4. Versatility
Sun canopies come in various shapes, sizes, and styles, making them versatile options for different outdoor settings. Whether you have a small balcony, spacious backyard, or poolside oasis, there’s a sun canopy solution to suit your needs. Additionally, many sun canopies are adjustable or retractable, allowing you to customize the amount of shade depending on the time of day or weather conditions.
Table: Comparison of Sun Canopy Benefits
| Benefit | Description |
|---|---|
| UV Protection | Blocks harmful UV rays, reducing the risk of sunburn and skin damage. |
| Temperature Control | Regulates the temperature of outdoor spaces by reducing heat buildup. |
| Enhances Outdoor Living | Transforms outdoor areas into functional and inviting spaces for relaxation and entertainment. |
| Versatility | Available in various shapes, sizes, and styles to suit different outdoor settings. Some canopies are adjustable or retractable for added flexibility. |
These benefits highlight why investing in a sun canopy can be a valuable addition to your outdoor living space. Now, let’s explore the materials and tools you’ll need to create your own sun canopy.
Materials Needed
To make your own sun canopy, you’ll need a few essential materials and tools. Here’s a list of what you’ll require:
1. Fabric
Choose a durable, weather-resistant fabric for your sun canopy. Options include canvas, polyester, or shade cloth. Consider the color and UV protection rating of the fabric to ensure adequate sun protection.
2. Thread
Select a high-quality, UV-resistant thread that complements your chosen fabric. Polyester or nylon thread is suitable for outdoor applications and provides excellent durability.
Transform your patio into a shaded oasis with a well-installed canopy. Follow these steps on how to put up a patio canopy for a comfortable and stylish outdoor living space perfect for relaxation and entertainment
3. Sewing Machine
A sewing machine will make the assembly process faster and more efficient. Ensure your machine is capable of handling heavy-duty fabrics and has the necessary stitching options for reinforcement.
4. Scissors or Rotary Cutter
Sharp scissors or a rotary cutter will be needed to cut the fabric to size accurately. Make sure your cutting tool is suitable for the thickness of your chosen fabric.
5. Measuring Tape
A measuring tape is essential for taking accurate measurements of your outdoor space and determining the dimensions of your sun canopy.
Table: Materials and Tools for Making a Sun Canopy
| Item | Description |
|---|---|
| Fabric | Durable, weather-resistant material such as canvas, polyester, or shade cloth. |
| Thread | High-quality, UV-resistant thread for sewing the canopy panels and seams. |
| Sewing Machine | Machine capable of handling heavy-duty fabrics and equipped with necessary stitching options. |
| Scissors/Rotary Cutter | Sharp cutting tools for accurately cutting the fabric to size. |
| Measuring Tape | Essential for taking measurements of your outdoor space and determining canopy dimensions. |
Gathering these materials and tools will set you up for success as you embark on the journey of creating your own sun canopy. In the next section, we’ll provide a step-by-step guide to help you through the DIY process.
Illuminate your outdoor space with a captivating canopy adorned with lights. Explore innovative ideas on how to create a stunning canopy with lights to enhance ambiance and create a magical atmosphere for gatherings and leisure.
Materials Needed
Now that you understand the benefits of a sun canopy, let’s gather the materials and tools you’ll need to create your own. Here’s a comprehensive list to get you started:
1. Fabric
The fabric you choose will be the main component of your sun canopy. Opt for a durable, UV-resistant fabric that can withstand outdoor conditions. Popular options include canvas, polyester, and shade cloth. Choose a color and pattern that complements your outdoor decor.
2. Measuring Tape
Accurate measurements are crucial for ensuring your sun canopy fits properly in your outdoor space. Invest in a quality measuring tape to measure the dimensions of your canopy area.
3. Scissors or Fabric Shears
You’ll need sharp scissors or fabric shears for cutting the fabric to the desired size and shape. Make sure your cutting tools are sharp to achieve clean, precise cuts.
4. Sewing Machine
If you’re planning to sew your sun canopy yourself, a sewing machine will be essential. Choose a machine suitable for outdoor fabrics and capable of handling heavy-duty stitching.
5. Thread
Select a high-quality, UV-resistant thread that matches the color of your fabric. This will ensure your seams are strong and durable, capable of withstanding exposure to the elements.
6. Grommets
Grommets are metal or plastic rings used to reinforce the edges of the canopy and provide attachment points for ropes or cords. Choose rust-resistant grommets in a size appropriate for your canopy fabric.
Table: Materials and Tools for Making a Sun Canopy
| Material/Tool | Description |
|---|---|
| Fabric | Durable, UV-resistant material such as canvas, polyester, or shade cloth. |
| Measuring Tape | Tool for taking accurate measurements of the canopy area. |
| Scissors or Fabric Shears | Sharp cutting tools for cutting the fabric to size and shape. |
| Sewing Machine | Machine for sewing the fabric panels together. |
| Thread | High-quality, UV-resistant thread for stitching the fabric. |
| Grommets | Metal or plastic rings used to reinforce edges and provide attachment points. |
Gathering these materials and tools will set you up for success as you embark on your sun canopy DIY project. In the next section, we’ll walk you through the step-by-step process of making your own sun canopy.
Step-by-Step Guide
Now that you have all the necessary materials and tools, let’s dive into the process of making your own sun canopy. Follow these steps to create a custom canopy that will provide shade and style to your outdoor space:
1. Choose the Right Fabric
Begin by selecting a durable, UV-resistant fabric for your sun canopy. Consider factors such as color, pattern, and breathability. Canvas, polyester, and shade cloth are popular options for outdoor use.
Maximize resources and creativity by repurposing tarps into functional canopy covers. Discover practical tips on how to transform a tarp into a perfect canopy cover for cost-effective and customizable solutions to shelter from the sun.
2. Measurements and Cutting
Use a measuring tape to determine the dimensions of your canopy area. Measure the length, width, and height of the space where you’ll install the canopy. Add extra fabric for seams and hems. Once you have your measurements, use sharp scissors or fabric shears to cut the fabric to size and shape.
3. Sewing Process
If you’re sewing the canopy yourself, set up your sewing machine with a suitable needle and thread. Begin by sewing hems along the edges of the fabric panels to prevent fraying. Then, stitch the panels together to create the desired canopy shape. Reinforce seams with additional stitching for durability.
4. Installing Grommets
Once the canopy is assembled, reinforce the edges with grommets. Mark the locations for the grommets along the perimeter of the canopy, spacing them evenly apart. Use a grommet kit to punch holes in the fabric and insert the grommets. This will provide attachment points for ropes or cords when installing the canopy.
5. Attaching to Support Structures
Finally, install the canopy in your outdoor space. Depending on your setup, you may attach the canopy to existing structures such as pergolas, posts, or trees. Use ropes, cords, or hooks to secure the canopy in place, ensuring it is taut and stable. Test the canopy to ensure it provides adequate shade and coverage.
Table: Step-by-Step Guide to Making a Sun Canopy
| Step | Description |
|---|---|
| 1. Choose the Right Fabric | Select a durable, UV-resistant fabric suitable for outdoor use. |
| 2. Measurements and Cutting | Measure the dimensions of your canopy area and cut the fabric to size and shape. |
| 3. Sewing Process | Sew hems along the edges of fabric panels and stitch panels together to create the canopy shape. |
| 4. Installing Grommets | Reinforce the edges with grommets to provide attachment points for ropes or cords. |
| 5. Attaching to Support Structures | Install the canopy in your outdoor space, securing it to existing structures with ropes, cords, or hooks. |
Following these steps will help you create a custom sun canopy tailored to your outdoor space. In the next section, we’ll discuss how to choose the right fabric for your canopy.
5. Step-by-Step Guide
Now that you have all the necessary materials and tools, it’s time to embark on the journey of creating your very own sun canopy. Follow these step-by-step instructions to bring shade and style to your outdoor space:
5.1 Choosing the Right Fabric
The first step in making a sun canopy is selecting the fabric. Consider the following factors when choosing your fabric:
- Durability: Opt for a fabric that is sturdy and can withstand outdoor conditions, including exposure to UV rays, wind, and rain.
- UV Resistance: Look for fabrics labeled as UV-resistant to provide maximum protection from the sun’s harmful rays.
- Color and Design: Choose a color and pattern that complements your outdoor decor and personal style.
Table: Comparison of Fabric Options
| Fabric | Durability | UV Resistance | Color/Design Options |
|---|---|---|---|
| Canvas | High | Yes | Limited |
| Polyester | High | Yes | Wide Range |
| Shade Cloth | High | Yes | Limited |
5.2 Measurements and Cutting
Once you’ve selected your fabric, it’s time to measure and cut it to size. Follow these steps:
- Measure the area where you want to install the sun canopy, taking into account any support structures or anchor points.
- Add extra fabric for seams and hemming.
- Use scissors or fabric shears to cut the fabric to the desired size and shape, ensuring clean, straight edges.
5.3 Sewing Process
If you’re comfortable with sewing, you can stitch the fabric panels together to create your sun canopy. Follow these steps:
- Place the fabric panels together, aligning the edges evenly.
- Use a sewing machine and UV-resistant thread to sew the panels together along the edges, creating strong, secure seams.
- Reinforce the corners and edges with additional stitching for added durability.
5.4 Installing Grommets
To reinforce the edges of your sun canopy and provide attachment points, you’ll need to install grommets. Follow these steps:
- Determine the spacing and placement of the grommets along the edges of the canopy.
- Use a grommet kit and follow the manufacturer’s instructions to punch holes and install the grommets securely.
- Ensure the grommets are evenly spaced and tightly secured to prevent tearing or damage.
Table: Steps for Making a Sun Canopy
| Step | Description |
|---|---|
| Choosing Fabric | Selecting a durable, UV-resistant fabric that complements your outdoor decor. |
| Measurements/Cutting | Measuring the canopy area and cutting the fabric to size and shape. |
| Sewing Process | Stitching the fabric panels together using a sewing machine and UV-resistant thread. |
| Installing Grommets | Adding grommets to reinforce the edges of the canopy and provide attachment points. |
By following these step-by-step instructions and referring to the provided tables, you’ll be well on your way to creating a beautiful and functional sun canopy for your outdoor space. In the next section, we’ll discuss tips for choosing the right fabric for your canopy.
6. Choosing the Right Fabric
When it comes to selecting the fabric for your sun canopy, making the right choice is crucial for both functionality and aesthetics. Here are some tips to help you choose the perfect fabric for your DIY project:
6.1 Consider Durability
Since your sun canopy will be exposed to outdoor elements such as sun, wind, and rain, durability is paramount. Look for fabrics that are specifically designed for outdoor use and can withstand prolonged exposure to UV rays without fading or deteriorating.
6.2 Opt for UV-Resistant Fabrics
UV resistance is essential to protect you and your loved ones from harmful UV radiation. Choose fabrics that are treated or manufactured with UV-resistant properties to provide maximum protection against the sun’s rays. This will not only keep you safe but also prolong the lifespan of your canopy.
6.3 Evaluate Color and Design Options
The color and design of your fabric can significantly impact the overall look and feel of your outdoor space. Consider the aesthetic of your existing decor and choose a fabric color and pattern that complements it seamlessly. Additionally, lighter colors tend to reflect more sunlight, keeping the area underneath the canopy cooler.
Table: Comparison of Fabric Options
| Fabric | Durability | UV Resistance | Color/Design Options |
|---|---|---|---|
| Canvas | High | Yes | Limited |
| Polyester | High | Yes | Wide Range |
| Shade Cloth | High | Yes | Limited |
By comparing different fabric options based on durability, UV resistance, and color/design options, you can make an informed decision that meets your specific needs and preferences.
In the next section, we’ll delve into the crucial step of taking accurate measurements and cutting the fabric for your sun canopy.
7. Measurements and Cutting
Taking precise measurements and cutting the fabric accurately are essential steps in ensuring that your sun canopy fits perfectly and looks professional. Here’s how to go about it:
7.1 Measure the Canopy Area
Using a measuring tape, carefully measure the area where you intend to install the sun canopy. Take into account any support structures, such as posts or walls, where the canopy will be attached. It’s crucial to measure both the length and width of the canopy area accurately to ensure a proper fit.
7.2 Add Extra Fabric for Seams and Hemming
Once you’ve determined the dimensions of the canopy area, add a few inches of extra fabric on all sides to accommodate seams and hemming. This additional fabric will ensure that your canopy has clean, finished edges and a professional appearance.
7.3 Cut the Fabric to Size and Shape
Using sharp scissors or fabric shears, carefully cut the fabric to the size and shape indicated by your measurements. Make sure to follow your markings precisely to achieve clean, straight edges. If your canopy has a specific design or shape, such as a triangle or rectangle, use a ruler or straight edge to guide your cuts.
7.4 Double-Check Measurements
Before proceeding to the next steps of the DIY process, double-check your measurements to ensure accuracy. It’s better to catch any mistakes now rather than later when it may be more challenging to correct them. Take your time during this step to ensure that your canopy will fit perfectly once it’s installed.
Table: Steps for Measuring and Cutting Fabric
| Step | Description |
|---|---|
| Measure Canopy Area | Use a measuring tape to determine the dimensions of the area where the sun canopy will be installed. |
| Add Extra Fabric | Add a few inches of extra fabric on all sides to accommodate seams and hemming. |
| Cut Fabric to Size | Use sharp scissors or fabric shears to cut the fabric to the size and shape indicated by your measurements. |
| Double-Check Measurements | Before proceeding, double-check your measurements to ensure accuracy and avoid any potential errors. |
Taking accurate measurements and cutting the fabric precisely are crucial steps in the sun canopy DIY process. In the next section, we’ll delve into the sewing process, where you’ll bring your canopy to life.
7. Measurements and Cutting
Accurate measurements and precise cutting are essential for ensuring your sun canopy fits perfectly and looks professional. Follow these steps to get it right:
7.1 Measure the Area
Using a measuring tape, carefully measure the area where you intend to install the sun canopy. Take into account any support structures, such as poles or walls, and allow for extra fabric for seams and hemming.
7.2 Add Allowances
Once you have your measurements, add allowances for seams and hems. This extra fabric will ensure that your canopy fits snugly and looks neat once it’s installed. It’s better to have a little extra fabric than not enough.
7.3 Cut the Fabric
With your measurements and allowances in hand, it’s time to cut the fabric. Use sharp scissors or fabric shears to make clean, straight cuts along the marked lines. Take your time and double-check your measurements before cutting to avoid any costly mistakes.
7.4 Consider Fabric Orientation
Depending on the design of your sun canopy and the width of your fabric, you may need to cut multiple panels and seam them together. Pay attention to the orientation of the fabric’s pattern or texture to ensure consistency across the canopy.
Table: Steps for Measuring and Cutting Fabric
| Step | Description |
|---|---|
| Measure Area | Use a measuring tape to determine the dimensions of the space where the sun canopy will be installed. |
| Add Allowances | Add allowances for seams and hems to ensure a proper fit. |
| Cut Fabric | Use sharp scissors or fabric shears to cut the fabric according to your measurements. |
| Consider Orientation | Pay attention to the fabric’s pattern or texture when cutting multiple panels. |
Taking accurate measurements and cutting the fabric carefully are crucial steps in the sun canopy-making process. In the next section, we’ll explore the sewing process for assembling your canopy.
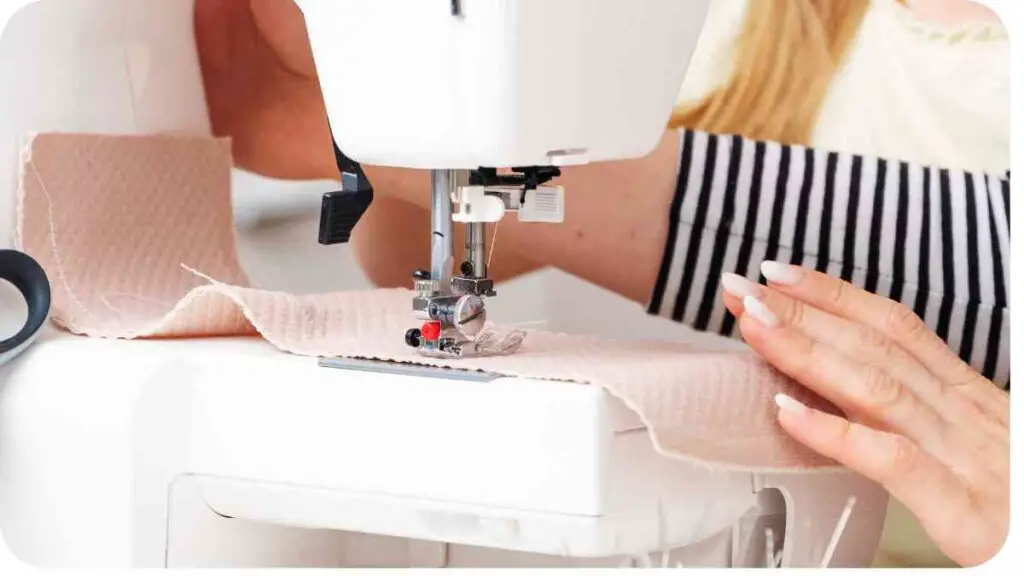
8. Sewing Process
Sewing the fabric panels together is a fundamental step in creating your sun canopy. Follow these guidelines to ensure a sturdy and professional-looking canopy:
8.1 Align Fabric Panels
Lay out the fabric panels on a flat surface, ensuring that the edges are aligned evenly. Use pins or clips to hold the panels in place and prevent them from shifting during sewing.
8.2 Stitching Method
Set up your sewing machine with a suitable needle and thread. Use a straight stitch or zigzag stitch to join the fabric panels together, depending on your preference and the type of fabric you’re using.
8.3 Seam Allowance
Maintain a consistent seam allowance as you sew, typically around ¼ to ½ inch from the edge of the fabric. This will ensure that your seams are strong and secure.
8.4 Reinforce Seams
After sewing the fabric panels together, reinforce the seams by backstitching at the beginning and end of each seam. This prevents the stitches from unraveling over time and adds extra durability to your canopy.
Table: Sewing Process for Making a Sun Canopy
| Step | Description |
|---|---|
| Align Fabric | Lay out fabric panels and align edges evenly. |
| Stitching | Use a sewing machine to stitch panels together using a straight or zigzag stitch. |
| Seam Allowance | Maintain a consistent seam allowance (¼ to ½ inch) from the edge of the fabric. |
| Reinforce Seams | Backstitch at the beginning and end of each seam to reinforce and prevent unraveling. |
By following these steps and referring to the provided table, you can confidently sew your fabric panels together to create the main body of your sun canopy. In the next section, we’ll discuss the installation of grommets to reinforce the edges of the canopy.
9. Installing Grommets
Grommets are essential for reinforcing the edges of your sun canopy and providing sturdy attachment points for ropes or cords. Follow these steps to install grommets securely:
9.1 Determine Placement
Decide where you want to place the grommets along the edges of your sun canopy. The spacing and placement will depend on the size and shape of your canopy, as well as any support structures or anchor points.
9.2 Mark Hole Positions
Using a fabric marker or chalk, mark the positions for the grommet holes on the fabric. Make sure the markings are evenly spaced and aligned along the edges of the canopy.
9.3 Punch Holes
Using a hole punch or grommet punch tool, carefully punch holes through the marked positions on the fabric. Be sure to follow the manufacturer’s instructions for your specific type of grommets.
9.4 Insert Grommets
Insert the grommets through the punched holes, ensuring that they are positioned correctly with the flat side on the underside of the fabric and the flange on top.
9.5 Secure Grommets
Using a grommet setting tool or press, secure the grommets in place by pressing down firmly on the flange. This will crimp the grommet and create a tight seal, preventing it from coming loose.
Table: Steps for Installing Grommets on a Sun Canopy
| Step | Description |
|---|---|
| Determine Placement | Decide where to place grommets along the edges of the canopy. |
| Mark Hole Positions | Use a fabric marker or chalk to mark the positions for grommet holes on the fabric. |
| Punch Holes | Punch holes through the marked positions on the fabric using a hole punch or grommet punch tool. |
| Insert Grommets | Insert grommets through the punched holes, ensuring correct positioning. |
| Secure Grommets | Secure grommets in place using a grommet setting tool or press to crimp them tightly onto the fabric. |
Installing grommets is a crucial step in the sun canopy-making process, as they provide reinforcement and attachment points for securing the canopy in place. In the next section, we’ll discuss how to attach the canopy to support structures.
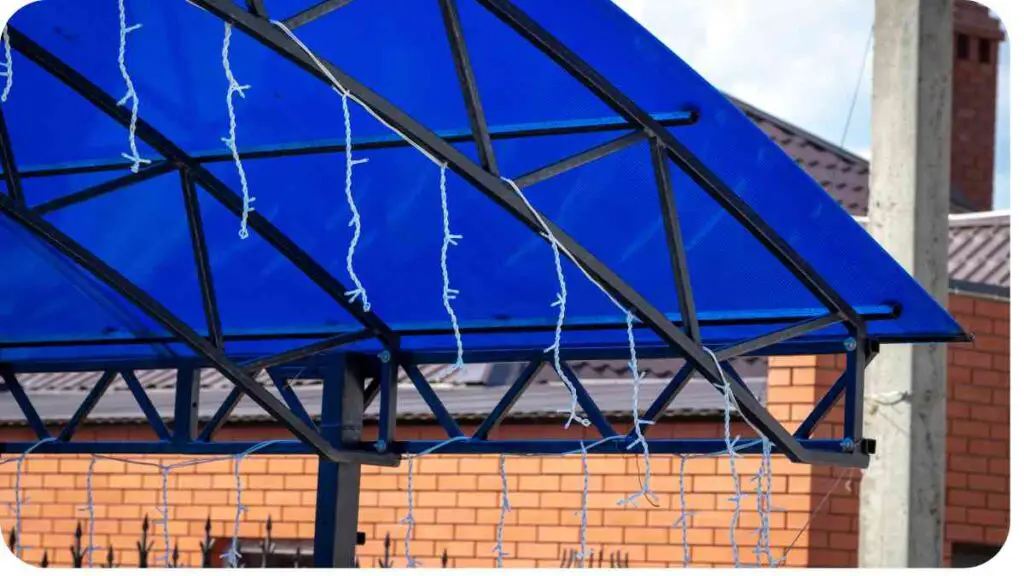
10. Attaching to Support Structures
Once you’ve completed sewing and installing grommets on your sun canopy, it’s time to attach it to support structures such as poles, walls, or anchor points. Here’s how to do it effectively:
10.1 Identify Anchor Points
Determine where you’ll be attaching the canopy, whether it’s to existing structures like pergolas or to standalone poles. Ensure that the anchor points are sturdy and capable of supporting the weight of the canopy.
10.2 Measure and Cut Rope/Cords
Cut ropes or cords to the appropriate length for securing the canopy to the anchor points. Be sure to leave extra length for tying knots and adjusting tension as needed.
10.3 Thread Ropes/Cords Through Grommets
Thread the ropes or cords through the grommets along the edges of the canopy. Start from one corner and work your way around, ensuring that each grommet is securely attached to a rope or cord.
10.4 Securely Tie Knots
Once the ropes or cords are threaded through the grommets, securely tie knots at the anchor points to hold the canopy in place. Use a strong knotting technique such as a double knot or bowline to ensure stability.
10.5 Adjust Tension
After tying knots, adjust the tension of the ropes or cords to ensure that the canopy is taut and secure. This will prevent sagging and ensure optimal shade coverage.
Table: Steps for Attaching a Sun Canopy to Support Structures
| Step | Description |
|---|---|
| Identify Anchor Points | Determine where to attach the canopy and ensure anchor points are sturdy. |
| Measure and Cut Rope/Cords | Cut ropes or cords to the appropriate length for securing the canopy. |
| Thread Ropes/Cords | Thread ropes or cords through the grommets along the edges of the canopy. |
| Securely Tie Knots | Securely tie knots at anchor points to hold the canopy in place. |
| Adjust Tension | Adjust the tension of ropes or cords to ensure the canopy is taut and secure. |
Following these steps will ensure that your sun canopy is securely attached to support structures, providing shade and protection for your outdoor space. In the next section, we’ll cover essential maintenance tips to keep your canopy in top condition.
11. Maintenance Tips
Maintaining your sun canopy is essential for preserving its longevity and ensuring optimal performance. Here are some maintenance tips to keep your canopy in top condition:
11.1 Regular Cleaning
Regularly clean your sun canopy to remove dirt, dust, and debris that can accumulate over time. Use a mild detergent and water solution to gently scrub the fabric, then rinse thoroughly with clean water and allow it to air dry completely.
11.2 Inspect for Damage
Periodically inspect your sun canopy for any signs of wear, tear, or damage, such as frayed edges, loose stitches, or holes. Repair any minor damage promptly to prevent it from worsening and compromising the integrity of the canopy.
11.3 Store Properly
During periods of inclement weather or when not in use, store your sun canopy properly to protect it from the elements. Remove the canopy from its support structures and store it in a clean, dry place away from direct sunlight and moisture.
11.4 Avoid Harsh Chemicals
Avoid using harsh chemicals or abrasive cleaners on your sun canopy, as they can damage the fabric and reduce its lifespan. Stick to mild detergents and gentle cleaning methods to preserve the integrity of the fabric.
Table: Maintenance Tips for Sun Canopies
| Maintenance Task | Description |
|---|---|
| Regular Cleaning | Clean the canopy regularly with a mild detergent and water solution to remove dirt and debris. |
| Inspect for Damage | Periodically inspect the canopy for signs of wear or damage and repair as needed. |
| Store Properly | Store the canopy in a clean, dry place away from sunlight and moisture when not in use. |
| Avoid Harsh Chemicals | Avoid using harsh chemicals or abrasive cleaners that can damage the fabric. |
By following these maintenance tips and referring to the provided table, you can ensure that your sun canopy remains in excellent condition for years to come. In the next section, we’ll address some frequently asked questions about sun canopies.
11. Maintenance Tips
Proper maintenance is key to ensuring that your sun canopy remains in top condition and provides long-lasting shade and protection. Follow these essential tips to keep your canopy looking great:
11.1 Regular Cleaning
Regularly clean your sun canopy to remove dirt, debris, and stains that can accumulate over time. Use a mild detergent and water solution to gently scrub the fabric, then rinse thoroughly with clean water and allow it to air dry completely.
11.2 UV Protection
To prolong the life of your sun canopy, apply a UV protectant spray specifically designed for outdoor fabrics. This will help prevent fading, discoloration, and degradation caused by prolonged exposure to the sun’s UV rays.
11.3 Inspect for Damage
Periodically inspect your canopy for any signs of damage, such as tears, fraying, or loose stitching. Address any issues promptly to prevent further damage and ensure the structural integrity of the canopy.
11.4 Remove During Inclement Weather
During severe weather conditions such as heavy rain, strong winds, or snowfall, it’s best to remove the sun canopy and store it indoors to prevent damage. This will help extend the lifespan of the fabric and protect it from harsh elements.
11.5 Storage
When not in use, store your sun canopy in a clean, dry, and well-ventilated area to prevent mold and mildew growth. Fold or roll the canopy neatly to avoid creasing or wrinkling, and store it in a protective cover or bag if possible.
Table: Maintenance Tips for Sun Canopies
| Maintenance Task | Description |
|---|---|
| Regular Cleaning | Clean canopy with mild detergent and water solution, rinse thoroughly, and air dry. |
| UV Protection | Apply UV protectant spray to prevent fading and degradation from sun exposure. |
| Inspect for Damage | Periodically check canopy for tears, fraying, or loose stitching, and repair as needed. |
| Remove During Inclement Weather | Take down canopy during severe weather to prevent damage. |
| Storage | Store canopy in a clean, dry area when not in use, avoiding creasing or wrinkling. |
By following these maintenance tips and referring to the provided table, you can prolong the life of your sun canopy and enjoy its benefits for years to come. In the next section, we’ll address some frequently asked questions (FAQs) about sun canopies.
12. Frequently Asked Questions (FAQs)
Here are answers to some commonly asked questions about sun canopies:
12.1 How do I choose the right size sun canopy for my outdoor space?
When selecting a sun canopy, consider the dimensions of your outdoor area, including the length, width, and height available for installation. Measure the space carefully and choose a canopy size that provides adequate coverage without overwhelming the area.
12.2 Can I use a sun canopy in windy conditions?
While sun canopies can provide shade and protection from the sun, they may not be suitable for use in high winds. To prevent damage or accidents, it’s best to take down the canopy during windy conditions or invest in a sturdy, wind-resistant design.
12.3 How do I clean my sun canopy?
To clean your sun canopy, use a mild detergent and water solution to gently scrub the fabric. Rinse thoroughly with clean water and allow the canopy to air dry completely before reinstalling it. Avoid using harsh chemicals or abrasive cleaners, as they can damage the fabric.
12.4 Can I leave my sun canopy up year-round?
While some sun canopies are designed for permanent installation, it’s generally recommended to take down the canopy during inclement weather or when not in use for extended periods. Proper storage and maintenance will help prolong the life of your canopy and ensure its continued functionality.
12.5 How long will my sun canopy last?
The lifespan of a sun canopy depends on various factors, including the quality of the fabric, maintenance practices, and exposure to the elements. With proper care and maintenance, a high-quality sun canopy can last several years, providing shade and protection for your outdoor space.
Table: Frequently Asked Questions (FAQs) about Sun Canopies
| Question | Answer |
|---|---|
| How do I choose the right size sun canopy for my outdoor space? | Consider the dimensions of your outdoor area and choose a canopy size that provides adequate coverage. |
| Can I use a sun canopy in windy conditions? | It’s best to take down the canopy during windy conditions to prevent damage or accidents. |
| How do I clean my sun canopy? | Clean canopy with mild detergent and water, rinse thoroughly, and air dry completely. |
| Can I leave my sun canopy up year-round? | It’s generally recommended to take down the canopy during inclement weather or when not in use for extended periods. |
| How long will my sun canopy last? | The lifespan depends on factors such as fabric quality and maintenance, but with proper care, it can last several years. |
These FAQs provide valuable insights into common concerns and considerations when it comes to choosing, installing, and maintaining a sun canopy. In the concluding section, we’ll summarize the key points discussed in this guide.
13. Conclusion
In this comprehensive guide, we’ve covered everything you need to know about making a sun canopy for your outdoor space. From understanding the benefits of sun canopies to selecting the right materials, sewing techniques, and maintenance tips, you now have the knowledge and tools to embark on your DIY project with confidence.
We began by exploring the various types of sun canopies available, including triangular sails, retractable awnings, shade sails, and pergola canopies. Understanding the benefits of sun canopies, such as UV protection, temperature control, and enhanced outdoor living, helped underscore the importance of incorporating one into your outdoor space.
Next, we delved into the materials and tools needed for making a sun canopy, including durable fabrics like canvas, polyester, and shade cloth, as well as essential tools such as measuring tape, scissors, sewing machines, and grommets.
We then provided a detailed step-by-step guide, from measuring and cutting the fabric to sewing panels together, installing grommets, and attaching the canopy to support structures. Each step was accompanied by clear instructions and helpful tables to guide you through the process effectively.
Additionally, we discussed important maintenance tips to ensure the longevity and performance of your sun canopy, including regular cleaning, UV protection, inspection for damage, and proper storage during inclement weather.
Finally, we addressed some frequently asked questions about sun canopies, providing valuable insights into choosing the right size, cleaning and maintenance, and the lifespan of your canopy.
By following the advice and instructions outlined in this guide, you can create a beautiful and functional sun canopy that enhances your outdoor living space and provides shade and protection for years to come. So, roll up your sleeves, gather your materials, and get ready to enjoy the benefits of your DIY sun canopy!
Further Reading
For more information and inspiration on DIY sun canopies, check out these resources:
- A Quick DIY Sun Shade for the Backyard: This blog post provides a quick and easy tutorial for creating a sun shade for your backyard using simple materials.
- DIY Patio Sun Shade Sail: Sailrite offers a comprehensive guide to making your own patio sun shade sail, complete with step-by-step instructions and video tutorials.
- A Simple DIY Shade Sail: Hannah Bullivant shares her experience and tips for creating a simple yet stylish DIY shade sail for your outdoor space.
FAQs
How do I choose the right size sun canopy for my outdoor space?
The size of your sun canopy depends on the dimensions of your outdoor area. Measure the space carefully and choose a canopy size that provides adequate coverage without overwhelming the area.
Can I leave my sun canopy up year-round?
It’s generally recommended to take down the canopy during inclement weather or when not in use for extended periods to prevent damage.
How do I clean my sun canopy?
Clean the canopy with a mild detergent and water solution, rinse thoroughly, and air dry completely to remove dirt and debris.
What materials do I need to make a sun canopy?
You’ll need durable fabric, measuring tape, scissors, a sewing machine, UV-resistant thread, grommets, and ropes or cords for attachment.
How long will my sun canopy last?
The lifespan of a sun canopy depends on factors such as fabric quality, maintenance, and exposure to the elements, but with proper care, it can last several years.

I am Hellen James, a professional handywoman with expertise in improving home and garden spaces by using pergolas, gazebos, and tents.
