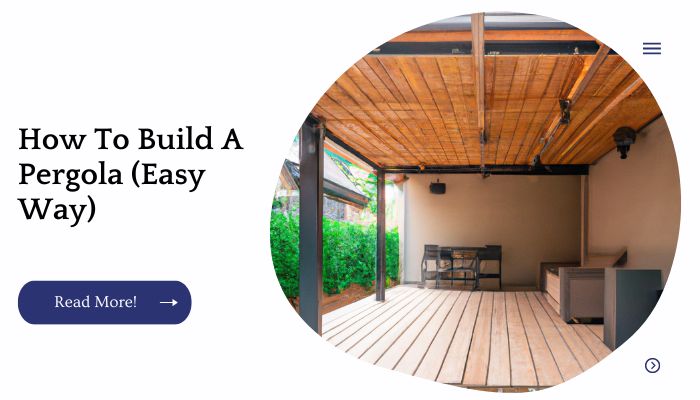
You’ve just built the most beautiful pergola in your back yard. You can’t wait for your friends and family to come over and see it.
But there’s one thing missing: The perfect set of chairs to sit under it. While you could pick up some cheap patio chairs from Home Depot or Lowe’s, why not build them yourself? Pergolas are easy to make and they’re portable too!
So learn how to build a pergola with the following simple instructions:
| Takeaways |
|---|
| Building a pergola can be made easy with the right guidance and instructions. |
| Proper anchoring is crucial for the stability and durability of a pergola. |
| Understanding different anchoring methods allows for flexibility in installation. |
| Building a pergola on a concrete patio requires specific steps for proper attachment. |
| Incorporating a pergola into an existing deck can enhance outdoor living spaces. |
| Adding a pergola over a deck or patio provides shade and aesthetic appeal. |
| Careful consideration of materials and design ensures a long-lasting pergola. |
| Regular maintenance and inspection are important for the upkeep of a pergola. |
| Checking local regulations and obtaining permits may be necessary before building a pergola. |
| DIY construction of a pergola can be a fulfilling and cost-effective project. |
Choose A Location
The first step to building a pergola is choosing the right location. It should be close to your house, in a sunny spot that’s protected from any strong winds. It should also be near your patio or deck so that it’s easy for you to access your outdoor space.
The next step is deciding whether you want to do it yourself or hire someone else to help with the project. If you choose DIY, make sure that you have all of the necessary tools before getting started on construction!
When it comes to building a pergola on a concrete patio, proper anchoring is crucial for stability and durability. Our detailed guide on how to anchor a pergola to a concrete patio provides step-by-step instructions and expert tips to ensure your pergola stands strong against the elements and enhances your outdoor space.
Measure & Mark The Location Of Your Posts
Before you begin to build your pergola, make sure to measure and mark the location of your posts.
First, level the ground where you will be installing the posts by using a spirit level or water level. If necessary, dig holes for them so that they will be set in soil that is at least 2” below ground level. This ensures that they remain stable in all kinds of weather conditions, especially if there are high winds or heavy rain.
Next, make sure that each post is spaced evenly apart from one another this will help with stability and support as well as visual appeal! Finally, make sure that each post is deep enough to support whatever structure type it will be supporting (or alternately use braces).
Dig Holes For Your Posts
You’ll want to dig holes that are at least 6 feet deep and a few inches wider than the diameter of your posts.
The tops of the posts should be 2 feet below ground level, so if you’re using 4x4s that’s two feet below the surface of your yard.
You’ll also need to make sure that all four posts are level with each other (and therefore level with your deck).
For this, I recommend using a laser level or an old-fashioned spirit level (the kind with liquid inside it), which will tell you if one end is higher than another.
If you don’t have either tool available, just eyeball it by setting all four ends on some sort of straight edge like a wooden board or concrete slab and see how they line up.
Transform your deck into a stylish and functional outdoor oasis by adding a pergola. Learn how to securely attach a pergola to your deck with our informative article on how to anchor a pergola to a deck. Discover different attachment methods and gain insights into ensuring a safe and structurally sound installation.
Put In Your Posts And Tamp The Concrete
Once the posts are in place, they need to be poured with concrete. To ensure the posts are evenly spaced and at the proper height, use a measuring tape to measure from the ground to where each post will be placed. The measurement should be marked out on the ground before pouring any concrete.
Pour and tamp your top layer of base (step 1). Be sure not to pour too much at once! After this first layer sets up for about 30 minutes, add more base if needed until you reach a level higher than what you want for your final flooring height (i.e., if you’re building an 8-foot pergola, use a 6-inch thick slab).
Once set up again wait another 30 minutes pour another layer of base right over it until it tops out slightly lower than your desired finished surface height (so that when we put our flooring down later on we can trim off any excess).
Now comes one important detail: A 10 gallon bucket makes roughly 12 gallons of concrete mix so make sure that doesn’t happen here!
It’s better to have too little than too much as we learned during our own build experience while pouring our post holes into freshly tamped footings only after realizing there was still some left!
Now let’s move onto step 3 where we return back inside so we can continue building our pergola alongside this handy guide!
Cut & Attach The Joists And Support Beams
Once you have the joists cut, it’s time to attach them to the support beams. Use 2-inch screws or nails to secure each end of each joist to its respective support beam.
At this point, you can also drill pilot holes through both sides of each post (you’ll need these for attaching your horizontal supports).
Finally, attach two braces between each pair of posts with 3½ inch screws or nails from below.
Attach The Rafters And Purlins
Next, attach the rafters to the purlins with nails or screws. The purlins should be level and flush with each other. Use a level to check if they are level, then use a plumb bob to check if they are plumb.
Set Up Temporary Post Supports
Before you begin building the pergola, you need to set up the post supports. In this case, we’re using a 4×4 piece of lumber (the same size as a 2×6) because it provides more surface area for attaching with lag bolts and because it will be less likely to split than a 2×6 over time.
You want to make sure that your posts are level so that they don’t twist or fall over when you start adding weight on top of them.
Attach each one at least 10 feet into the ground using concrete embeds or tie downs, which will keep them straight even when heavy snow falls during winter months. Use a level to make sure your posts are straight before attaching them permanently!
Creating a solid foundation for your pergola is essential for its long-term stability. Our comprehensive guide on how to anchor a pergola to the ground provides valuable tips and techniques to secure your pergola firmly. Explore various anchoring methods and choose the one that best suits your specific landscape and preferences.
Install Lattice For More Shade
Adding a lattice panel to your pergola will help you get more shade. Lattice can be installed on top of the roof and down along the sides, or it can simply be placed over the top rails.
Once you have installed the lattice panels and painted them if desired, it is time to hang them from the frame of your pergola!
Cover With Plants For More Privacy
If you’re looking for a more private space, consider covering your pergola with plants. Choose a mix of tall and short plants that bloom at different times of the year. This will ensure privacy throughout the growing season.
You can also plant some evergreen plants to provide year-round shade, which is especially useful if you live in an area where snow can accumulate in winter months.
| Plant Type | Description |
|---|---|
| Bamboo | Fast-growing and dense plant that creates a tall and effective privacy screen. |
| Arborvitae | Evergreen shrubs or trees that offer year-round privacy with their dense foliage. |
| Leyland Cypress | Rapid-growing coniferous tree that forms a dense barrier for privacy and noise reduction. |
| Privet Hedge | Versatile hedge plant with dense foliage that can be pruned to desired height and shape. |
| Boxwood | Compact evergreen shrub commonly used for hedges, providing a classic and formal look. |
| Laurel | Broadleaf evergreen shrub or tree with thick foliage, ideal for creating a lush privacy screen. |
| Ficus | Large-leaved, tropical plant that can be used to create a living green wall or privacy hedge. |
| Climbing Roses | Vining roses that can be trained to grow on trellises or fences, adding beauty and privacy. |
| Ivy | Climbing vine with dense foliage that can cover walls or trellises for increased privacy. |
| Hops | Fast-growing vine that can quickly cover structures and provide privacy with its thick foliage. |
Add A Chandelier
Chandeliers can be found in almost every room of the house and are an elegant way to add light to your space.
Chandeliers come in many different styles, materials and price ranges. If you’re looking for something with a rustic vibe, you could try out this distressed metal chandelier from Pottery Barn that’s just $199 on sale!
If you’d rather go modern or traditional, there are plenty of options available too. The key is finding one that fits with both your décor and budget!
If you prefer not to drill into your outdoor surface, you can still anchor your pergola effectively. Discover alternative methods in our easy-to-follow guide on how to anchor a pergola without drilling. Explore non-invasive options while ensuring your pergola remains stable and safe for all your outdoor gatherings.
Install Cup Holders
If you’re going to be spending a lot of time relaxing, it’s helpful to have cup holders. You can buy them or make your own with materials like wood and metal.
For example, you could use metal posts and wire baskets (or other types of containers) to hold drinks or snacks.
You could also create a holder by drilling holes in the end rails, then attaching metal hooks and hanging them from hinges so they swing down when needed.
If you want the cup holders to blend in with your design aesthetic, combine them with other décor elements such as railing details or decorative paint designs.
Install An Outdoor TV
If you want to be able to watch TV outside, it’s easy to do. You can either use a TV mount or place the TV on a stand. If you purchase an outdoor antenna, which is available at most hardware stores in the spring, set it up and connect it directly to your television.
Otherwise, install a streaming device such as Google Chromecast or Roku and then use an indoor antenna (which will also need power) and convert the signal into Wi-Fi so that all devices connected within range can receive it.
If your home theater setup includes a projector rather than a traditional screen, consider placing that at the back of your pergola so everyone can see clearly and if everything is wireless already (keyboard & mouse), there’s no reason not to!
Build A Fireplace Or Fire Pit
Building a fire pit is an excellent way to add functionality and style to your pergola. Fire pits can be used for cooking food, relaxing after hard work, entertaining guests, providing warmth on cold nights or even as security features!
When building your own fire pit it’s important to consider the materials that you use. If the area where you live is prone to high winds then using bricks or rocks might not be such a good idea; instead opt for lighter materials such as wood or plastic.
Smaller fire pits are also very popular these days because they’re easy to move around and therefore great if you want something portable that can go with you when traveling abroad but still retain its functionability at home too.”
| Option | Description |
|---|---|
| Wood-Burning Fireplace | Traditional fireplace option that uses wood as fuel for a cozy ambiance. |
| Gas Fireplace | Convenient and clean-burning fireplace fueled by natural gas or propane. |
| Electric Fireplace | Easy-to-install and energy-efficient option that provides instant heat. |
| Outdoor Fire Pit | Versatile and portable fire feature for outdoor gatherings and warmth. |
| Chiminea | Freestanding, chimney-like fireplace that radiates heat in all directions. |
| Tabletop Fire Bowl | Compact and decorative fire pit that sits on a table for intimate settings. |
| Gas Fire Table | Stylish and functional fire feature integrated into an outdoor dining table. |
| Portable Propane Fire | Compact and portable fire pit option powered by propane gas. |
| DIY Fire Pit | Customizable fire pit created using personal design and construction. |
| Built-In Fire Pit | Permanent fire pit built into the ground or hardscape for a seamless look. |
Install A Bar Cart Or Beverage Center
Look for a bar cart with an open bottom shelf so that you can easily reach the items you want to serve. This will give you a lot of flexibility when placing the bottles, glasses and other accessories.
If you plan on storing wine bottles in your bar cart, check for additional racks or holders in the middle compartment so that your wine stays at an appropriate temperature and is protected from light exposure (this can damage tannins).
Cleaning a bar cart should be done annually, but if there are any spills or stains on top or around the edges, it should be cleaned immediately by wiping down all surfaces with a damp cloth or sponge dipped in warm water and mild soap solution (used sparingly).
The best way to prevent mold growth is by keeping moisture evaporating from inside outwards this means that paper towels should only be used once before being discarded;
Cloth towels should hang over dry towel bars between uses; and sponges should only be used once before being tossed into the trash bin outside where they can soak up rain water until they’re washed regularly at least once weekly during warm weather months (or more often if needed). And finally…
Never leave dirty dishes sitting around after using them!
That goes double for glassware which could shatter if dropped onto ceramic tiles while washing them by hand…or worse still – cause injury if dropped into someone else’s head while standing too close behind him/her while carrying both hands full right behind his/her back.”
Enhance your existing deck with the timeless elegance of a pergola. Our expert advice on adding a pergola over an existing deck provides valuable insights into design considerations, structural support, and integration techniques. Elevate your outdoor space and create a harmonious blend of style and functionality.
Hang Curtains
If you’re adding a pergola to your outdoor living space, you might want to consider adding curtains as well.
Curtains can be attached directly to the roof or hung from hooks at various heights in order to provide privacy as well as block out sun and rain during the summer months.
In colder months, you can keep them closed for extra warmth by placing them in front of windows or doors.
You could also use them to hide unsightly objects such as storage containers or tools that aren’t being used at the moment. Curtains are also a great way to add some style and personality to your patio area!
| Option | Description |
|---|---|
| Curtain Rods | Traditional and versatile option for hanging curtains, available in various lengths. |
| Curtain Tracks | Provides a sleek and modern look, allowing curtains to slide smoothly along the track. |
| Tension Rods | Adjustable rods that require no drilling, perfect for temporary or rental setups. |
| Command Hooks | Damage-free option using adhesive hooks, ideal for lightweight curtains or sheers. |
| Magnetic Rods | Utilizes magnets for easy installation and removal, suitable for metal surfaces. |
| Ring Clips | Attach curtains to rings that slide onto a rod, offering an elegant and classic style. |
| Clip-on Rings | Clips directly onto the curtain fabric, providing a contemporary and minimalistic look. |
| Grommets | Metal-rimmed openings in the curtain fabric, allowing for smooth sliding on a rod. |
| Tab Tops | Loops or fabric tabs sewn onto the curtain, offering a casual and relaxed appearance. |
| Curtain Wire | Taut wire system for lightweight curtains, enabling a minimalist and clean aesthetic. |
Add Throw Pillows And Blankets
Throw pillows and blankets are great ways to add color and texture to your pergola. You can make your own throw pillows, or buy them from a store. Blankets are another great option for adding color, but they need to be larger than the space you have available in order to be effective.
If you don’t want to worry about sewing your own pillows, consider making large ones out of fabric scraps and stuffing them with cotton balls or fluff from old clothes (this helps them hold their shape).
You can also try sewing two rectangle pieces together at right angles so that they form a square; these pieces will fit perfectly onto the sides of your pergola frame.
Conclusion
You can build a pergola by yourself, but it will be easier and faster with a few people helping. It will also be safer if you have another person to hold the ladder while you work from above.
If you are building on your own property and don’t want anyone knowing what you are doing, then consider building in the evening after everyone has gone home for the day!
Further Reading
How to Build a Pergola: A comprehensive guide from Family Handyman that provides step-by-step instructions and detailed illustrations for building a pergola.
Free Pergola Plans: The Spruce offers a collection of free pergola plans, allowing you to choose from a variety of designs and styles to suit your outdoor space.
Build a Pergola Plans: Old World Garden Farms provides detailed plans and tips for building a pergola, along with helpful insights on selecting materials and customizing your project.
FAQs
Can I build a pergola without professional help?
Yes, building a pergola can be a DIY project with the right tools, materials, and instructions. By following comprehensive guides and plans, you can successfully build a pergola on your own.
What materials are commonly used for building a pergola?
Common materials for building a pergola include wood, such as cedar or pressure-treated lumber, as well as metal and vinyl. The choice of material depends on factors like personal preference, budget, and desired aesthetics.
Do I need a permit to build a pergola?
Permit requirements for building a pergola vary based on local building codes and regulations. It is advisable to check with your local authorities or building department to determine if a permit is needed for your specific project.
How long does it take to build a pergola?
The time required to build a pergola depends on various factors, such as the complexity of the design, the size of the pergola, and the experience of the builder. On average, it may take several days to a few weeks to complete a pergola project.
How do I maintain and care for a pergola?
Proper maintenance of a pergola involves regular cleaning, inspection for any damage or wear, and applying protective finishes or sealants as needed. Additionally, trimming nearby vegetation and addressing any structural issues promptly can help ensure the longevity of your pergola.

I am Hellen James, a professional handywoman with expertise in improving home and garden spaces by using pergolas, gazebos, and tents.
