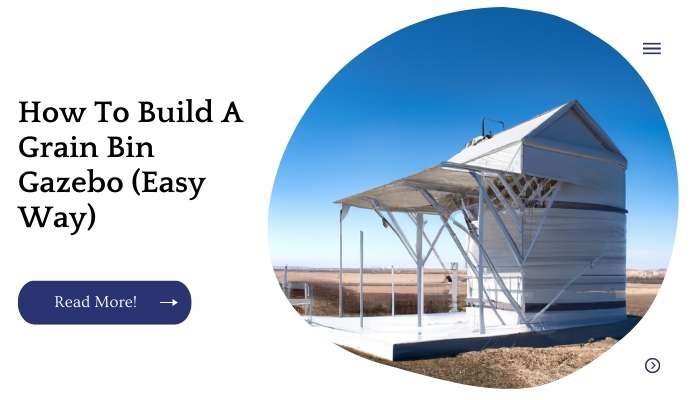
As a small-scale farmer, it’s important to take advantage of every square inch of your land. One way to do that is by converting an old grain bin into a gazebo.
Not only will this have multiple uses on your farm, but it will add value and beauty to your property as well.
A sturdy wood grain bin can last for years and years if properly cared for – so long as there is no rotting or damage from mice or other pests! Here’s how you can turn an old wooden grain bin into a beautiful gazebo:
| Takeaways |
|---|
| Building a grain bin gazebo can be achieved using the easy way described in the provided URL. |
| The URL offers step-by-step instructions for constructing a grain bin gazebo. |
| It provides guidance on the materials and tools required for the project. |
| The resource emphasizes the simplicity of the process, making it accessible for DIY enthusiasts. |
| The easy-to-follow instructions ensure a successful grain bin gazebo construction. |
| Tips and techniques are provided to simplify the building process and enhance the final result. |
| The URL offers valuable insights into design considerations and layout options for a grain bin gazebo. |
| Building a grain bin gazebo can be a cost-effective and unique addition to your outdoor space. |
| The provided URL is a valuable resource for anyone interested in constructing their own grain bin gazebo. |
Cut Out The Base
Use a circular saw to cut out the base.
Cut out a square of plywood that’s the same size as your bin, but with an extra inch or two around it. This will allow you to screw it into place easily later on.
Use a jigsaw to cut out the corners, so you end up with an octagon shape for your base. If you don’t have or can’t find a jigsaw, don’t worry you can simply use tin snips or even just scissors to make these cuts instead (though they’ll take longer).
Cut out your base-shaped plywood pieces from each other and from around their edges so that all of them fit neatly together when stacked up in their proper order: bottom piece first, followed by two sides, then two more sides etc., until all four layers are complete!
Then secure them together using screws every few inches along each seam line before moving on down below…
When it comes to building a grain bin gazebo, the roof is a crucial component. Our handyman advice on how to build a gazebo roof provides valuable tips and techniques to ensure a sturdy and well-constructed roof for your gazebo project.
Anchor The Gazebo
You will also need to anchor your gazebo. You can use rebar if you have it, but if not, a large metal spike will work just as well.
Use a level to make sure the gazebo is level and then secure the base of your gazebo onto your grain bin using steel spikes or some other type of anchoring device.
| Anchoring Method | Description |
|---|---|
| Ground Stakes | Secure the gazebo by driving metal or plastic ground stakes into the ground through designated anchor points. This method provides stability but may not be suitable for all soil types. |
| Concrete Footings | Create concrete footings and embed anchor brackets or bolts into them during the gazebo’s construction. This method offers excellent stability and is ideal for permanent gazebo installations. |
| Auger Anchors | Utilize auger-style anchors that screw into the ground, providing a secure hold. These anchors are often used in conjunction with straps or cables attached to the gazebo’s legs for added stability. |
| Sandbags or Weights | Place sandbags or heavy weights on the gazebo’s legs or anchor points to provide stability. This method is useful for temporary or portable gazebos and can be easily adjusted or removed. |
| Gazebo Tie-Down Kits | Use gazebo tie-down kits specifically designed for anchoring gazebos. These kits typically include straps or cables, stakes, and tensioning mechanisms to secure the gazebo to the ground. |
| L-Brackets or Angle Braces | Attach L-brackets or angle braces to the gazebo’s legs and secure them to a solid surface, such as a concrete patio or deck, using appropriate fasteners. This method offers stability and prevents movement. |
| Permanent Foundation | For permanent gazebos, construct a foundation using concrete, stone, or other suitable materials to anchor the gazebo securely. This method provides long-term stability and durability. |
| Consult Local Building Codes | Always consult local building codes and regulations to ensure compliance with any specific requirements for anchoring gazebos in your area. |
Build The Walls
The next step is to build the walls. To do this, you will need to cut 2x4s into pieces that are long enough to fit between the grain bin and its foundation.
Lay out your 2x4s on top of the walls of the grain bin and measure how much space is between them. Once you have measured this distance, use a level to make sure that each wall is level with one another (this will help keep rain from getting in).
Once you have set up all four walls and ensured they are level, use a plumb bob or line level to ensure that each wall is vertical as well (this will help keep rain from leaking in above ground).
If any adjustments need made at this point and it’s likely there will be some cut more 2x4s until everything looks perfect!
Looking for a simple guide to get started on your grain bin gazebo construction? Our step-by-step instructions on how to make a gazebo will provide you with the foundational knowledge and inspiration you need to create your own beautiful gazebo.
Place The Roof Ring
Place the roof ring. Secure it to the top edges of your bin using screws or nails, making sure it’s level and straight.
Measure from the center of each side to the outside edge of your bin (including the overhang), then divide that measurement in half: you want one set of gaps to be shorter than the other by about one inch (2.5 cm) so that water can run down into them instead of pooling on your gazebo’s surface.
To center your posts along this line, add another 1/2″ (13 mm) or so onto each side’s measurement before going forward with step #3 below.
Place The Roof Panels
Once you’ve got your panels leveled, it’s time to put them in place. The best way to do this is with a level it will ensure that each panel is perfectly even so that there are no gaps between them and the walls of your gazebo.
Try to resist putting too much pressure on each panel as you slide them into place; if they’re not sliding easily, then they need more time drying out or some extra weight added on top (like cement blocks). Once all four panels are in place and evenly spaced apart, it’s time to secure things down!
Next comes securing those roof panels down tightly with screws or nails (using a hammer), but don’t go overboard here you still want good airflow through there so that moisture doesn’t build up inside.
Take care not to hit any wires while hammering either; check yourself first before hitting anything else!
If you’re interested in building a grain bin gazebo, we’ve got you covered with a better way. Our guide on how to build a gazebo offers innovative techniques and design considerations to help you create a gazebo that stands out and meets your specific requirements.
Build A Sturdy Railing
The final step is to build your railing. You can use any type of lumber you have on hand, but we suggest using a 2×6 or 2×8 board.
Cut it to length and roundover the edges with a router and roundover bit. Then, hammer in nails at regular intervals along the length of the railing.
Build A Ladder
To build a ladder, you will need:
4 pieces of wood, each 2 feet long. You can use any kind of wood you have on hand. You can even use scrap materials if you want to make the project more affordable.
A drill or hammer
Nails or screws (optional)
Drill holes in the ends of each piece of wood. Make sure that these holes are big enough for your nails or screws to fit into them easily but small enough so they don’t weaken your ladder when you put pressure on it as you climb up and down it with food and drinks in hand!
Place two pieces vertically against each other so that they form an “L” shape, then attach them using either nails or screws (depending on what type work best).
Repeat this step twice more until all four corners are secure; then attach another vertical panel on top by drilling holes through both layers and attaching them with nails/screws again.”
| Material | Description |
|---|---|
| Wood | Choose sturdy and durable wood, such as pine or hardwood, for the ladder rails and steps. |
| Screws | Use appropriate screws to securely fasten the ladder components together. |
| Wood Glue | Apply wood glue to strengthen the joints and improve the ladder’s overall stability. |
| Sandpaper | Use sandpaper to smooth out rough edges and surfaces for a safer and more comfortable ladder. |
| Varnish or Paint | Apply a protective finish like varnish or paint to enhance the ladder’s appearance and protect it from moisture and wear. |
| Ladder Rungs | Depending on the ladder design, you may need pre-made ladder rungs or additional wooden pieces to create steps. |
| Measuring Tape | Ensure accurate measurements during the construction process for a well-balanced and functional ladder. |
| Saw | Use a saw to cut the wood to the desired lengths for the ladder’s rails and steps. |
| Drill | A drill will be needed to create pilot holes for screws and ensure precise assembly. |
| Level | Use a level to ensure the ladder is straight and properly balanced during construction. |
| Safety Equipment | Wear appropriate safety gear, including goggles and gloves, to protect yourself during the construction process. |
Install Stairs And Rails
Next, you’ll need to install the stairs and rails. For the best results, use wood for these components. Wood will last longer than plastic or metal and won’t warp as easily in moist conditions.
Also, consider using galvanized screws or nails to secure your rails and stairs in place; this step takes longer than it does for a typical deck project, but because grain bins are constantly exposed to weather elements like moisture and humidity (to say nothing of critters), you want everything on your gazebo frame even if it’s just one nail to be firmly screwed into place so that nothing can give way under pressure.
To help ensure that your work is level, use a laser leveler tool or old-fashioned bubble levels while mounting all of these components together.
The goal here is not only safety but also overall stability: if any part of the structure isn’t properly spaced apart at even intervals along its length (whether it’s a stair tread or an upright rail)
Then vibrations might occur over time as people walk across them or sit on benches within reach distance from one another without proper spacing between them first being factored into account beforehand by measuring distances between two points which were farther away than where they’d need to be located if they were right next door neighbors instead!
Securing your grain bin gazebo to a concrete foundation is essential for stability and durability. Our simple guide on how to anchor a gazebo to concrete provides step-by-step instructions and expert tips to ensure your gazebo stays firmly in place.
Stain And Seal The Wood
After you’ve built your grain bin, the next step is to stain and seal it. A good-quality stain will protect the wood from sun damage, moisture and insects.
Since grains can be very absorbent, make sure that you choose a stain that is compatible with the environment where you will be storing them snow, rain and sun are all factors that require consideration when choosing your finish product.
There are many different types of stains available; some are oil-based while others contain water-based acrylic compounds.
Oil-based stains tend to create a harder surface than water based ones; this creates more durability but also means that these products may not dry as quickly as their counterparts
| Brand | Description |
|---|---|
| Behr | High-quality wood stains and sealers with a wide range of colors and finishes. |
| Thompson’s WaterSeal | Trusted brand offering effective wood sealers for protection against water damage. |
| Minwax | Renowned for their wood stains and finishes, providing durability and enhancing the natural beauty of wood. |
| Cabot | Offers a variety of wood stains and sealers for long-lasting protection and color retention. |
| Varathane | Known for their fast-drying wood stains and sealers that provide a beautiful and durable finish. |
| Olympic | Offers a range of wood stains and sealers designed to protect against weathering and UV damage. |
| Ready Seal | Easy-to-apply wood stains and sealers that enhance wood grain while providing protection. |
| Defy | Specializes in water-based wood stains and sealers that are eco-friendly and provide superior protection. |
| Sikkens | Provides premium wood stains and sealers with excellent durability and resistance to weathering. |
| WoodRx | Offers wood stains and sealers that are environmentally friendly and provide long-lasting protection. |
Pour Concrete To Level The Base Of The Grain Bin
Using a level, check that the base of your grain bin is flat and level. If you don’t have a level, you can make one by placing two boards on top of each other and marking off where they meet in two different places.
Then, lay down some string between those marks and use it as your guide for making sure things stay straight (and not crooked).
Mix up enough concrete to fill all your holes with at least 6 inches deep (2×4 lumber will sit on top of this).
Then, pour it into each hole using a wheelbarrow or shovel until it’s filled about halfway up. If you don’t have any tools like these handy yet then just grab a bucket!
You can also use something else like an empty coffee can or anything else that’ll hold some water without tipping over but won’t leak out when tilted so don’t worry too much about getting creative here because there are no rules about how much or how little concrete goes into each hole as long as there’s enough for whatever material weighs down onto them later on–like dirt!
Wind can pose a significant challenge to the longevity of your grain bin gazebo. Discover proven ways to protect and secure your gazebo with our guide on how to secure a gazebo from wind. Learn valuable techniques to safeguard your gazebo against strong winds and enjoy its beauty for years to come.
Use Pieces Of Rebar To Create Anchors In Each Of The Holes
Use a drill to make holes in the base of the grain bin. These holes should be about 2 feet apart and at least 4 inches deep so that they can securely hold pieces of rebar.
Push pieces of rebar into each hole, making sure they go all the way down to the bottom of your bin so that they make secure anchors for your gazebo frame. If you have trouble driving them into place with your hands, use a hammer to pound them in further (carefully!).
Conclusion
Congratulations! You’ve just built a gazebo for your grain bin. You can now enjoy shade and comfort while you work in the garden or relax with friends and family. If you want to make your garden more beautiful, consider adding some flower beds or even a pond!
Further Reading
Here are some additional resources you may find helpful to explore more about grain bin gazebos:
These Grain Bin Gazebos Are the Perfect Summer Retreat: Discover stunning examples of grain bin gazebos that provide a perfect summer retreat. Explore creative designs and gather inspiration for your own project.
Grain Silo Gazebo: Learn about the unique charm and versatility of grain silo gazebos. This resource offers insights into repurposing grain silos and transforming them into beautiful outdoor spaces.
DIY Grain Bin Gazebo: Country Living provides a comprehensive guide on how to build your own DIY grain bin gazebo. Explore detailed instructions, helpful tips, and stunning photos for inspiration.
FAQs
Here are some frequently asked questions (FAQs) about grain bin gazebos:
How much does it cost to build a grain bin gazebo?
The cost of building a grain bin gazebo can vary depending on various factors, such as the size, materials used, and location. It’s best to consult a contractor or gather estimates based on your specific project requirements.
Can I repurpose an existing grain bin into a gazebo?
Yes, repurposing an existing grain bin into a gazebo is a popular option. It can provide a unique and rustic aesthetic to your outdoor space. However, it’s important to ensure the structural integrity and safety of the grain bin before proceeding with the conversion.
Do I need a permit to build a grain bin gazebo?
Permit requirements for building a grain bin gazebo can vary depending on your location and local building codes. It’s recommended to check with your local authorities or building department to determine if a permit is required for your specific project.
What are the advantages of a grain bin gazebo compared to traditional gazebos?
Grain bin gazebos offer a unique and distinctive look due to their cylindrical shape and rustic charm. They are often more durable and weather-resistant, making them a suitable choice for outdoor structures. Additionally, repurposing grain bins into gazebos can be an environmentally friendly option.
Can I customize the design of a grain bin gazebo?
Yes, one of the advantages of building a grain bin gazebo is the flexibility to customize the design. From the roof style to the interior layout, you can personalize the gazebo to match your preferences and create a unique outdoor space.

I am Hellen James, a professional handywoman with expertise in improving home and garden spaces by using pergolas, gazebos, and tents.
