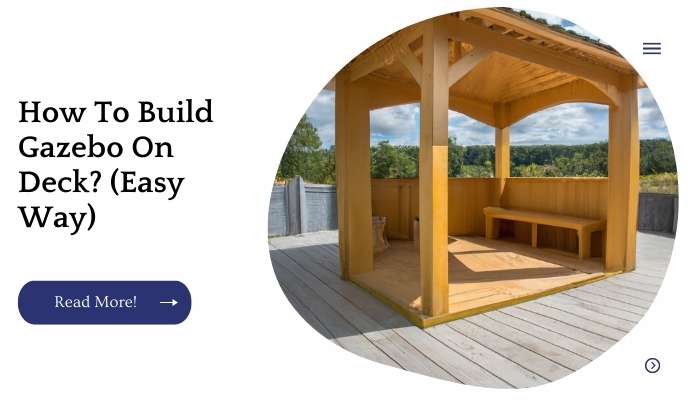
If you’ve got a deck or patio and are looking to expand your outdoor living space, the next logical step is building a gazebo.
A gazebo is an enclosed structure that provides shade from the sun, as well as protection from rain and wind.
It’s basically like having a second room outside your house for entertaining large groups of people perfect for barbecues, birthday parties and other fun gatherings with friends!
| Takeaways |
|---|
| Building a gazebo on a deck can provide a beautiful and functional outdoor space. |
| Proper planning is essential to ensure the deck can support the weight and structural requirements of the gazebo. |
| Following a step-by-step guide or consulting with professionals can help simplify the construction process. |
| Consideration should be given to the materials used, taking into account durability, aesthetics, and budget. |
| Regular maintenance and care are necessary to preserve the gazebo’s longevity and protect it from the elements. |
Step 1: Identifying the Materials
To build a gazebo on deck, you will need the following materials:
- Wooden lattice panels (enough to cover the space)
- Wood screws
- Drill or screwdriver with drill bit attachment
- Hammer
To assemble these materials, you will need the following tools:
Screwdriver
You can use either metal or wooden lattice panels for your gazebo. If using metal, make sure that it is not too flimsy and won’t bend in strong winds.
If using wood, choose untreated cedar because it is sturdy and rot-resistant. Cut the 2x4s so that they are about 12 inches long; this will allow them to be flush with each other when assembled into a box shape at each corner of your deck or patio area where you want to place your gazebo.
When choosing screws for this project make sure they are thick enough so they don’t split out through any holes in wood boards but thin enough so they can easily go through holes drilled into lattice panels without stripping them out completely (preferably 3/8″ diameter).
Looking to build a budget-friendly outdoor space? Our guide on how to build a cheap covered patio provides easy and cost-effective solutions to create a comfortable and stylish outdoor retreat.
Step 2: Planning Your Design
If you’re the type of person who likes to plan ahead, now is the time to do so.
Consider Your Needs and the Look You Want
What will your gazebo be used for? Will it be a place to sit down with a book and enjoy some quiet time or will it be an outdoor dining area? Are you looking for something that looks rustic or modern? These are all things to consider as they will affect what kind of design works best for your space.
Step 3: Choosing Lumber and Other Materials
Choose the right lumber. You’ll need to choose between softwood and hardwood lumber, depending on your climate. Softwoods like cedar or pine are more resistant to decay and insects, but they’re less structurally sound than hardwoods like oak or maple.
Choose nails and screws that are appropriate for how you plan to use them: for instance, if you want the gazebo to be able to withstand harsh weather conditions like snow and rain, consider using galvanized nails rather than ordinary ones because they won’t rust as quickly when exposed continually in rainy conditions.
If you’re planning on building an entire deck around your gazebo (which is an excellent idea), make sure all of your lumber is compatible with whatever type of decking material will be used
For example: pressure-treated wood may not work well with composite decking materials such as bamboo or plastic laminates because those types of materials have different expansion rates than regular wood does. Finally! It’s time for assembly!
Thinking of installing a patio door on concrete? Our step-by-step guide on how to install a patio door on concrete offers an easy way to add functionality and elegance to your outdoor living area.
Step 4: Installing Support Posts
Now that you’ve laid out your deck and set up the posts, it’s time to install the support posts. Support posts should be installed at least every 8 feet, and they should be placed at least 18 inches away from the house (this will allow water drainage), as well as 18 inches away from the deck or ground (this will also allow water drainage).
Support posts should also be positioned no more than 36 inches apart in any direction.
The support structure for your gazebo should include one main post centered between all four sides of your wooden deck, with two additional supports on each side of this main post.
Your gazebo will rest on these four corner posts. You can create a triangular shape by installing two additional diagonal supports between each side so that when viewed from above it looks like a diamond instead of a square shape.
| Support Post Installation Step | Description |
|---|---|
| Site Preparation | Clear the area where the support posts will be installed, ensuring it is level and free from any obstacles or obstructions. |
| Marking Post Locations | Determine the desired placement of the support posts, considering factors such as gazebo size, shape, and design. Use marking tools to indicate the exact positions where the posts will be installed. |
| Digging Holes | Dig holes at each marked location, ensuring the depth and diameter are appropriate for the size and type of support posts being used. Follow local building codes and guidelines for hole dimensions. |
| Placing Posts | Insert the support posts into the prepared holes, ensuring they are plumb (vertical) and level. Use temporary supports or braces to hold the posts in position during the installation process. |
| Adding Concrete Footings | Pour concrete into the holes around the support posts to create stable footings. Make sure the concrete completely fills the holes and allow it to cure according to the manufacturer’s instructions. |
| Securing Posts | Once the concrete has fully cured, secure the support posts in place using suitable hardware, such as post anchors, brackets, or through-bolts, depending on the specific gazebo design and structural requirements. |
| Checking Alignment | Verify that the support posts are still plumb and level after securing them. Make any necessary adjustments or corrections to ensure proper alignment. |
| Trimming Excess Post Length | If needed, trim the tops of the support posts to the desired height, considering factors such as gazebo roof height, support beam installation, and aesthetics. Use appropriate tools and techniques for a clean and accurate cut. |
| Treating or Protecting Posts | Apply a suitable protective coating or treatment to the support posts to enhance their durability and resistance to weathering, rot, or insect damage. Follow the manufacturer’s instructions for the chosen treatment product. |
Step 5: Cutting and Arranging the Decking
Measure and mark the decking. The decking will need to be cut into smaller pieces. You can use a circular saw or table saw, depending on how much wood you have to work with and whether it is enough to do efficiently with one tool or not.
Arrange the decking in a pattern. The arrangement of the decking should mirror any other patterns found in your home’s décor so that it fits seamlessly with the rest of your outdoor space.
Step 6: Attaching the Deck Rails and Balustrade
Once the posts and rails are in place, you can attach them to each other with screws. Make sure that they’re all level as you go along so that your final product is straight and sturdy.
Next, attach the balusters to each post using screws. Again, use a level to ensure that they’re spaced evenly from one another (and from the top of the deck rail). Once again, make sure that everything is level before securing it into place with screws.
Transforming your patio with floor tiles? Check out our easy-fix guide on how to lay patio floor tiles for expert tips and techniques to create a stunning and durable outdoor flooring surface.
Step 7: Assembling the Roof Structure
The roof structure is the most important part of your gazebo. It is imperative that you get it right, as the quality of your finished product will ultimately be dependent on this step.
For example, if you have difficulty installing roof trusses or plywood sheathing, then your project will take much longer than anticipated and may cost more because you have to hire professionals to complete these tasks for you.
Trusses are used to support any type of roof structure and should always be installed before sheathing so that they can support it properly.
Plywood sheathing is typically made from OSB (oriented strandboard) or plywood boards, which creates a smooth surface for shingling asphalt shingles over top later on in order to secure them snugly against one another when wetted down after installation has completed successfully according to instructions provided by professionals who specialize in building custom structures such as gazebos!
Step 8: Roof Framing Details
Once the rafters are installed, it’s time to install trusses for the roof. To do this, use a chalk line to mark them at each end and in the middle. Cut away any excess wood with a circular saw.
Use a power drill with a screwdriver bit to drive screws through the trusses into joists beneath them. (Note: If you’re using galvanized nails instead of screws, make sure they’re at least 24 inches apart.)
Once all of your rafters are installed and your trusses are installed making sure they go over top of the ridge beam on both ends at this point if you have one in place now it will be pretty easy to just grab onto something like two pieces of 2x4s or whatever else you’ve got laying around that’s handy
And just walk up there until everything lines up exactly how you want it to look like there’s no gaps whatsoever between these two pieces here so we did have some extra room I didn’t need so what better way than just back up down here?
| Roof Framing Detail | Description |
|---|---|
| Rafters | Horizontal beams that slope from the center of the gazebo’s roof to the outer edges, providing structural support and shape to the roof. |
| Ridge Beam | Horizontal beam that runs along the peak of the roof, connecting the tops of the rafters and providing stability and support to the roof structure. |
| Collar Ties | Horizontal beams that connect opposing rafters near the top of the roof, preventing the roof from spreading apart and adding additional structural strength. |
| Purlins | Horizontal beams that span between the rafters, providing support for the roof sheathing and helping to distribute the weight of the roof evenly. |
| Fascia Board | Horizontal board attached to the ends of the rafters, offering a finished look to the roof’s edge and providing a surface for attaching gutters or other decorative elements. |
| Soffit | Underside of the roof’s overhang, enclosed with panels or vents to provide ventilation and protect the roof structure from moisture damage. |
| Flashing | Thin metal strips or sheets installed at roof intersections and transitions to prevent water infiltration and direct it away from critical areas, such as valleys and chimneys. |
| Roof Sheathing | Solid or plywood panels attached to the rafters, providing a stable and even surface for the roof covering to be installed on top. |
| Roof Covering | Material used to protect the roof from the elements, such as shingles, metal roofing, thatch, or other suitable options based on personal preference and climate conditions. |
Step 9: Installing Roof Trusses, Plywood Sheathing and Asphalt Shingles.
Trusses are the most common type of roof framing. They can be made from either wood, metal or plastic.
Trusses are pre-fabricated and come in different sizes, so you’ll need to measure your building before purchasing a kit.
Asphalt shingles are commonly used on residential homes, but they’re also great for smaller structures like gazebos because they’re easy to install (and cheap!).
When it comes to building a gazebo, the roof is a crucial element. Our handyman advice on how to build a gazebo roof will help you construct a sturdy and weather-resistant covering for your outdoor oasis.
Step 10: Building a Wall Gable Roof For Hot Tub Gazebo On Deck
To make sure that the rafters are straight, you can use a level.
Cut the rafters with a circular saw to length. You will need one 8′ and two 6′ pieces of 2x10s for this project. You will also be using (4) 2×6’s so that your total length of wood is: 8′ + (2) 6′ + 4″ = 12 feet in length of lumber needed for this project.
Step 11: Building the Floor Frame for Hot Tub Gazebo On Deck
Next, you will be installing the floor joists. A floor frame will be installed on top of the deck frame to support your Gazebo On Deck.
The best material to use for your gazebo’s floor is tongue-and-groove 2×6 or 2×8 lumber (or material with a similar strength rating).
If you are building a spa hot tub gazebo on deck, pay special attention to where you want it located in relation to your home.
You want to make sure that the hot tub sits at least 30 feet away from any structure such as your house or garage.
Step 12. Adding plywood panels for floor of your gazebo.
Now that you have the frame built, it’s time to add the plywood floor. There are many ways to do this, but I’ll explain one way that works best for me and gives a nice finished look to my gazebos.
First things first: measure out where each piece of plywood will lay on top of the frame notches (see photo below). Then mark each piece with a pencil along its length and width using a ruler as straight edge guide (also shown below). Make sure your pencil marks line up at each end!
| Flooring Option | Description |
|---|---|
| Plywood Panels | Affordable and versatile option for creating a sturdy gazebo floor. |
| Composite Decking | Low-maintenance and durable material that mimics the look of natural wood. |
| Interlocking Tiles | Easy-to-install modular tiles that provide a customizable and slip-resistant surface. |
| Concrete Slab | Solid and long-lasting flooring option that requires professional installation. |
| Natural Wood Decking | Classic and aesthetically pleasing choice that requires regular maintenance. |
| Artificial Grass | Provides a soft and green surface, offering a natural and comfortable feel. |
Step 13. Setting up lattice panels around hot tub gazebo on deck.
Attaching the lattice panels to the hot tub gazebo on deck:
Cut a piece of lattice to fit your hot tub gazebo, and then attach it to the bottom of the deck using wood screws. This can be done before you install your wood posts or after they’re in place.
Using an electric drill, insert 3-inch screws into each post at least every 12 inches so that they’ll hold up against wind gusts without breaking off or falling over. If you don’t have access to an electric drill (or if you’re simply not comfortable using one), then use a hand screwdriver instead.
Want to enjoy your gazebo without pesky bugs? Our easy guide on how to screen in a gazebo provides step-by-step instructions to create a bug-free zone, allowing you to relax and unwind in your outdoor sanctuary.
Step 14. Finishing up gazebo.
Now that you’ve finished the framing and siding, it’s time to finish up your gazebo. Here are some tips for doing so:
Install the door lock. If you have a keyed deadbolt lock, install it now so that you can lock yourself in at night while keeping the screen door open for fresh air circulation.
Install windows and vents. The window flanges should be installed now so that they’re ready when it comes time to add the windows themselves later on (in step 19). Also, add roof vents in case of rain or snow on cold nights; these will make sure no water gets into your gazebo through its roofing materials.
Drywall interior walls with 2×4 studs attached behind them as supports (this is called “rebar”). Cover this wall surface with drywall paper before painting it! This will protect your investment from moisture damage over time especially important if it rains often where you live!
Conclusion
You’re almost done. Congratulations! All that remains is to add the finishing touches and get ready for your big day. If you’re feeling super ambitious, you could install a hot tub or pool beneath the gazebo on deck.
You can also use this project as an opportunity to add some greenery by planting flowers or shrubs around the perimeter of your new structure. There are many possibilities when it comes to enhancing an outdoor living space like this one—the sky’s the limit!
Further Reading
How to Build a Gazebo on a Deck: Learn from the experts at Garden Patch about the process of building a gazebo specifically on a deck. Gain insights into design considerations and construction techniques for a sturdy and beautiful deck-based gazebo.
Gazebo on Deck: A Complete Guide: Discover tips and tricks from 731 Woodworks on building a gazebo on a deck. This comprehensive guide covers everything from planning and materials to step-by-step instructions, helping you create a functional and visually appealing addition to your deck.
How to Build a Gazebo: The Family Handyman provides a detailed tutorial on building a gazebo from start to finish. Explore their guide to learn about foundation options, gazebo styles, and expert construction techniques, ensuring a successful gazebo project.
This selection of additional resources will provide you with more insights and instructions on building gazebos, including specific information about constructing one on a deck. Each link offers unique perspectives and valuable knowledge to help you with your gazebo construction project.
And here’s the FAQs section in markdown language:
FAQs
Can I build a gazebo on my existing deck?
Yes, it is possible to build a gazebo on an existing deck. However, it is essential to ensure that the deck can support the additional weight and structural requirements of the gazebo. Consulting with a professional or following a reliable guide is recommended to ensure a safe and stable construction.
What materials are commonly used for gazebo construction?
Gazebos can be constructed using various materials, including wood, vinyl, metal, and composite materials. The choice of materials depends on factors such as durability, aesthetics, budget, and personal preferences. Each material has its unique characteristics and considerations for construction.
Do I need a permit to build a gazebo on a deck?
The requirements for permits vary depending on your location and the specific regulations of your municipality or homeowner’s association. It is crucial to check with the local authorities and obtain any necessary permits or approvals before starting the construction of a gazebo on a deck.
How long does it take to build a gazebo on a deck?
The construction time for a gazebo on a deck can vary depending on factors such as the size, complexity of design, materials used, and the skill level of the builders. It is advisable to plan for an adequate timeline, considering potential challenges and allowing time for proper construction and finishing.
Are there any maintenance considerations for a gazebo on a deck?
Yes, maintaining a gazebo on a deck involves regular cleaning, inspections, and potential treatments to protect the structure from weather elements and wear. The specific maintenance requirements may vary based on the materials used and the climate in your area. Proper care and upkeep can help prolong the lifespan of your gazebo.

I am Hellen James, a professional handywoman with expertise in improving home and garden spaces by using pergolas, gazebos, and tents.
