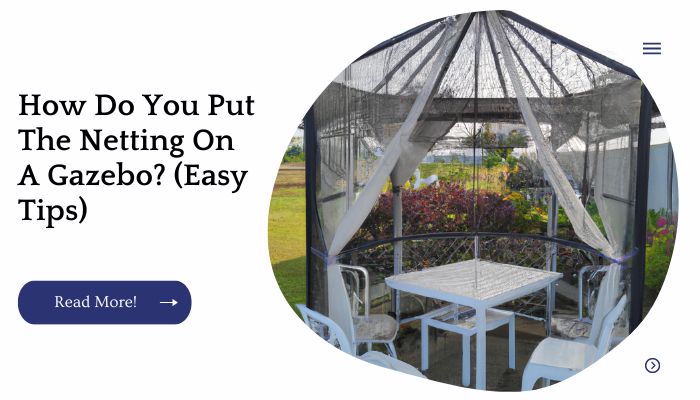
When you buy a gazebo, it comes with a tent-like canopy that you can pull over the top for protection from the elements.
But if you want to use your gazebo more like a screened-in porch than just an outdoor shelter, then you should consider adding screen netting.
Adding screen netting not only gives you privacy and shade but also adds another layer of safety against insects or falling tree branches.
| Takeaways |
|---|
| Attaching netting to a gazebo helps keep insects and bugs out. |
| Proper installation of netting ensures a snug and secure fit on the gazebo. |
| Using hooks or fasteners on the gazebo frame helps to hang the netting. |
| Adjusting the netting ensures complete coverage of the gazebo. |
| Regular inspection and maintenance of the netting are necessary for its effectiveness. |
Attach The Netting To The Ceiling
Attach the netting to the ceiling first. Since you’ve already determined how long your netting will be, it’s time to get started on attaching it.
Start in the middle of one side of your gazebo frame and work outward towards each corner.
Attach each corner of your netting directly to a pole using 3″ staples (or nails with a hammer).
Make sure that when you attach your netting at these four points, they are evenly spaced out so that they form an “X” shape, as this helps keep bugs from getting underneath and into your gazebo space.
Now comes attaching along all four sides: Starting at one end of each side and working inward towards corner posts; use hooks or eyelets placed every span between posts then clip onto them with metal clamps or small S-hooks.
When it comes to building a cheap covered patio, there are several creative solutions that can save you money without compromising on quality. Explore our guide on building a cheap covered patio to discover easy fix tips and budget-friendly options for creating your ideal outdoor space.
Determine Where To Hang The Netting
To determine where to hang the netting, you will need to consider the size of your gazebo and its shape.
If you are working with a hexagon or octagon gazebo, it is best to measure out each side of the structure individually and lay them down in an area where you can easily work on them.
Once all six sides of your gazebo are measured out on the ground, use a tape measure and note down how much additional material there is from edge to edge at each corner point.
Next, add together these measurements for each corner so that you know how much extra length will be needed for connecting all four corners together in order for them to fit properly inside each other when finished hanging up as one big netting unit.
Which Poles Need The Netting?
The first thing you need to do is decide which poles need the netting and which don’t. The grommet poles are the easiest, since there’s a small ring that has been pre-punched at the top of each one. Just slide that ring over your netting and it’ll stay in place until you want to remove it again.
The next type of pole is a hook. These have hooks at the top that can be used to secure your netting by wrapping them around whatever they’re attached to (like another pole).
If there aren’t any other poles nearby, but you still want something in place while you’re working on other tasks around your project, try using these hooks!
The third way we’ll talk about is with ringset poles; these have an extra feature called an EZ-Open Ringlet where users can easily open up the ringset without having tools or screws!
They work well with either metal or plastic materials just make sure everything fits before trying anything out though 🙂
Creating a gazebo doesn’t have to be a daunting task. Our simple guide on making a gazebo provides step-by-step instructions and valuable insights to help you bring your vision to life. Check out our guide on how to make a gazebo for a smooth and rewarding construction process
How To Thread The Netting
To start, you’ll need to figure out where to hang the netting. If it’s a small gazebo, this will be easier than for larger gazebos.
Once you’ve decided where the netting should go, use your tape measure and mark off where each pole needs the netting.
The next step is to determine how many holes need to be drilled into each pole based on where they are going and how much weight they can support.
Once you’ve figured out which poles need the netting (and know how many holes each one requires), take some time measuring uprights that require threaded holes and plan how exactly you’re going to attach them with string or rope so that no part of any structure comes loose during windy weather conditions!
Measure Netting Uprights
Now that you’ve got everything together, it’s time to measure your netting uprights. You’ll need a tape measure and a pencil.
First, measure the height of each upright between where it meets the gazebo frame and where it meets the top of your gazebo walls.
Then, measure out from either side along their length (between each upright), marking with a pencil where they connect to each other or to another component on that side of the structure (if there are any).
Next, take these measurements and divide them by two—one half for each side of your gazebo to find out how much space will be left between vertical supports when you install your netting panels.
| Measurement | Description |
|---|---|
| Height | The vertical measurement from the ground to the top of the netting uprights. |
| Width | The horizontal measurement between two opposing netting uprights. |
| Depth | The measurement from the front to the back of the netting uprights. |
| Distance between Uprights | The space between two adjacent netting uprights. |
| Brand-Specific Recommendations | Specific measurement guidelines provided by manufacturers for their netting products. |
Plan How To Attach The Netting
Once you’ve planned how to attach the netting, it’s time to put it on your gazebo. If you’re working with a metal frame and fabric, be sure that all of your attachments are done before you begin attaching the netting.
First, attach the netting to each upright. Then attach the bottom of each side panel by attaching it through one side panel and then attaching another piece from inside of the gazebo (this will keep bugs out).
Finally, add support straps at least every six feet around all four corners of the top structure and any other area where there is heavy strain on that part of your structure.
This will ensure that everything stays in place when there are strong winds or other weather conditions affecting your outdoor living space
Properly installing netting on a gazebo is essential for keeping pesky insects at bay. Learn the easy way to install gazebo netting with our comprehensive guide. Discover useful tips and techniques on installing gazebo netting to create a comfortable and bug-free outdoor retreat.
To Cut Or Not To Cut, That Is The Question!
The next step is to cut the netting to fit your gazebo. You can use scissors, but it’s recommended that you use a sharp knife instead since this will make the job easier and cut down on the time it takes you to complete.
If you’re using an electric trimmer or circular saw, make sure they are plugged into an outlet before attempting to use them!
Once you’ve made your cuts, look at how long each piece of netting is so that it fits nicely within your gazebo.
You don’t want one that’s too short because then there will be gaps between panels; nor do you want one that’s too long because it’ll be difficult to hang properly.
Plan For Excess Length At Corners
When you’re working with a gazebo, it helps to have some extra netting on hand. This will allow you to cut the corner pieces and wrap them around corners for an even, finished look.
It’s also important to make sure that there is enough netting left over for each piece in case something goes wrong or if there are any issues with your measurements (which can happen!).
You may want to consider investing in two rolls of netting—one for each side of the gazebo—so that one isn’t left unused while work is being done on another side.
| Aspect | Description |
|---|---|
| Brand-Specific Recommendations | Specific guidelines provided by manufacturers for handling excess length at corners. |
| Additional Material | The extra length of netting required to properly cover corners. |
| Overlapping Method | Technique used to overlap and secure excess netting at corners. |
| Fastening Options | Different methods or accessories available to fasten and secure excess netting at corners. |
| Corner Reinforcement | Reinforcing corners with additional support or reinforcement to ensure proper coverage. |
Hang Your Gazebo Netting
First, you need to hang your gazebo netting. You’ll want to use a ladder for this process. There are many ways you can secure the netting, but we recommend using a hammer and nails if you’re hanging it over something sturdy like a deck or patio.
Another option is using staples in conjunction with hooks on either side of where you’ll be securing your gazebo netting so that it won’t fall off when wind comes through and knocks into it.
Finally, if you have enough space on the sides of your gazebo frame (between five inches and two feet), then consider using ringlets that attach directly onto each side of your frame where hooks would normally go.
These will help keep your gazebo stable even if there’s not much clearance between its top railing or roofline and whatever surface it’s attached to.
Constructing a sturdy gazebo roof is crucial for long-term durability. Our handyman advice on building a gazebo roof provides expert tips and techniques to ensure your gazebo stands the test of time.
Attach Netting With Hooks And Ringlets
First, you’ll need to make sure that the netting is attached at the top of your gazebo. This will be where the majority of your weight is distributed, so it’s important to make sure this area is secure.
Next, attach netting to each corner and side with ringlets or hooks. If you have a smaller gazebo, you may be able to get away with only attaching it at these points; however, if you’re working with a larger structure or one made from sturdy material like wood or metal as opposed to PVC you should also attach it along every edge of your gazebo as well.
Use A Staple Gun To Attach Your Gazebo Netting
- Use a staple gun to attach your gazebo netting.
- Make sure you use a staple gun that is appropriate for the material you are using, including whether or not it can be used underwater (many cannot).
- Attach netting to the poles, not the floor of your gazebo.
- If you use plastic clips instead of staples, make sure they are placed between two pieces of wood so that they don’t cause any damage if someone trips on them and falls into your pool!
| Step | Description |
|---|---|
| Step 1 | Position the netting on the desired area of the gazebo. |
| Step 2 | Hold the netting firmly and align it to ensure proper coverage. |
| Step 3 | Use a staple gun to secure the netting to the frame or structure of the gazebo. |
| Step 4 | Start from one corner and work your way around, stapling the netting at regular intervals. |
| Step 5 | Apply additional staples as needed to ensure the netting is securely attached. |
| Step 6 | Trim any excess netting for a clean and neat appearance. |
Glue On Your Gazebo Netting
If you’re going to put your gazebo netting on, you’ll want to use a glue that is water resistant, UV resistant, weather resistant, mildew resistant and heat-resistant. The glue should also be rust-resistant and easy to wipe clean.
When applying the glue:
Apply it evenly over both sides of each strip of netting. Use an even amount of pressure so that no parts are left uncured or partially glued down (this could cause problems later).
Elevate the ambiance of your gazebo with enchanting lights that create a magical atmosphere. Discover our expert tips on decorating a gazebo with lights to transform your outdoor space into a captivating retreat. Explore creative ideas and practical advice on decorating a gazebo with lights to add a touch of brilliance to your evenings.
Conclusion
With these tips, you’re ready to go! It’s time to hang your gazebo netting and have fun sitting in it on those cool nights.
If you have any questions about putting up your gazebo netting or if something didn’t work for you, leave us a comment below and we’ll get back with an answer ASAP.
Further Reading
Here are some additional resources for further reading on attaching mosquito nets to gazebos:
How to Attach a Mosquito Net to a Gazebo: This comprehensive guide from Garden Patch provides step-by-step instructions and tips for attaching a mosquito net to your gazebo, ensuring a bug-free outdoor experience.
How to Set Up a Gazebo with Netting: Master Canopies offers a helpful guide on setting up a gazebo with netting, providing insights into the process and helpful tips for a successful installation.
How to Attach a Mosquito Net to a Gazebo: A Step-by-Step Guide: Craftsmumship presents a detailed step-by-step guide for attaching a mosquito net to your gazebo, ensuring you can enjoy your outdoor space without the annoyance of mosquitoes.
These resources provide valuable information and instructions on attaching mosquito nets to gazebos, allowing you to create a comfortable and insect-free environment.
FAQs
Here are some frequently asked questions about attaching mosquito nets to gazebos:
How do I attach a mosquito net to my gazebo?
To attach a mosquito net to your gazebo, follow these steps:
- Measure the dimensions of your gazebo.
- Select a suitable mosquito net that matches the size of your gazebo.
- Install hooks or fasteners on the gazebo frame.
- Hang the mosquito net securely from the hooks or fasteners.
- Adjust the net to ensure it covers the entire gazebo and is tightly secured.
Can I use any mosquito net for my gazebo?
It is recommended to use mosquito nets specifically designed for gazebos. These nets are usually made of durable materials and come in sizes that fit standard gazebo dimensions. Using a net specifically designed for gazebos ensures proper coverage and a better fit.
How can I ensure the mosquito net is securely attached?
To ensure the mosquito net is securely attached to your gazebo, use strong hooks or fasteners that can withstand outdoor conditions. Additionally, make sure to tighten the net properly and regularly inspect the attachment points for any signs of loosening or damage.
Can I leave the mosquito net attached to my gazebo all the time?
Yes, you can leave the mosquito net attached to your gazebo for an extended period, especially during mosquito-prone seasons. However, it is advisable to periodically inspect the net and make any necessary repairs or adjustments to maintain its effectiveness.
How often should I clean the mosquito net?
The frequency of cleaning your mosquito net depends on various factors, including the environment and the level of dirt or debris it accumulates. Generally, it is recommended to clean the net at least once a season or whenever you notice a significant buildup of dirt, dust, or stains. Follow the manufacturer’s instructions for proper cleaning methods.

I am Hellen James, a professional handywoman with expertise in improving home and garden spaces by using pergolas, gazebos, and tents.
